
Introduction:
This article includes the overall process of building up a honeypot using Cowrie with a SIEM/XDE tool(Wazuh) to detect and analyze attacks. At the end, we also use SSH tunnel to protect our Wazuh Manager website. Here’s the following configuration settings:
VPS1(Wazuh Server)
- vCPU: 4
- RAM: 8GiB
- Storage: 150GiB
- System: Ubuntu 24.04

VPS2(Cowrie + Wazuh agent)
- vCPU: 2
- RAM: 2GiB
- Storage: 50GiB
- System: Ubuntu 24.04
Outline
Setup, Config, Run
Wazuh Server(VPS1)
- Install Wazuh Server
curl -sO https://packages.wazuh.com/4.14/wazuh-install.sh && sudo bash ./wazuh-install.sh -a
- Get Default User & Password
User: admin
Password: 9xxxxxxxxxxxxxxxxxxxxxxxx8
- You can find password using this command
sudo tar -O -xvf wazuh-install-files.tar wazuh-install-files/wazuh-passwords.txt
- Next, try if you can access Wazuh dashboard by directly accessing
https://WAZUH_SERVER_PUBLIC_IP. If you can’t, let’s debug and find what the problem is.
# Ensure these three services is active
sudo systemctl status wazuh-dashboard
sudo systemctl status wazuh-indexer
sudo systemctl status wazuh-manager

# Ensure Wazuh binds 443/tcp successfully
sudo ss -lntp | grep ':443'

# Check wazuh on localhost. It should return something like curl: (60) SSL certificate problem: unable to get local issuer certificate (If not, lets continue)
curl -I https://127.0.0.1

# If not, check firewalls and iptables
ufw status verbose
iptables -S

# It should probably be ufw which didn't open 443/tcp by default
ufw allow 443/tcp
ufw reload
ufw status verbose

# # To                         Action      From
# --                         ------      ----
# 22/tcp                     ALLOW IN    Anywhere
# 443/tcp                    ALLOW IN    Anywhere
# 22/tcp (v6)                ALLOW IN    Anywhere (v6)
# 443/tcp (v6)               ALLOW IN    Anywhere (v6)

# ufw status numbered
# ufe delete [No] to delete rules

# Check on localhost again. This time should return "SSL certificate problem"
curl -I https://127.0.0.1
- Finally, access Wazuh dashboard via
https://WAZUH_SERVER_PUBLIC_IP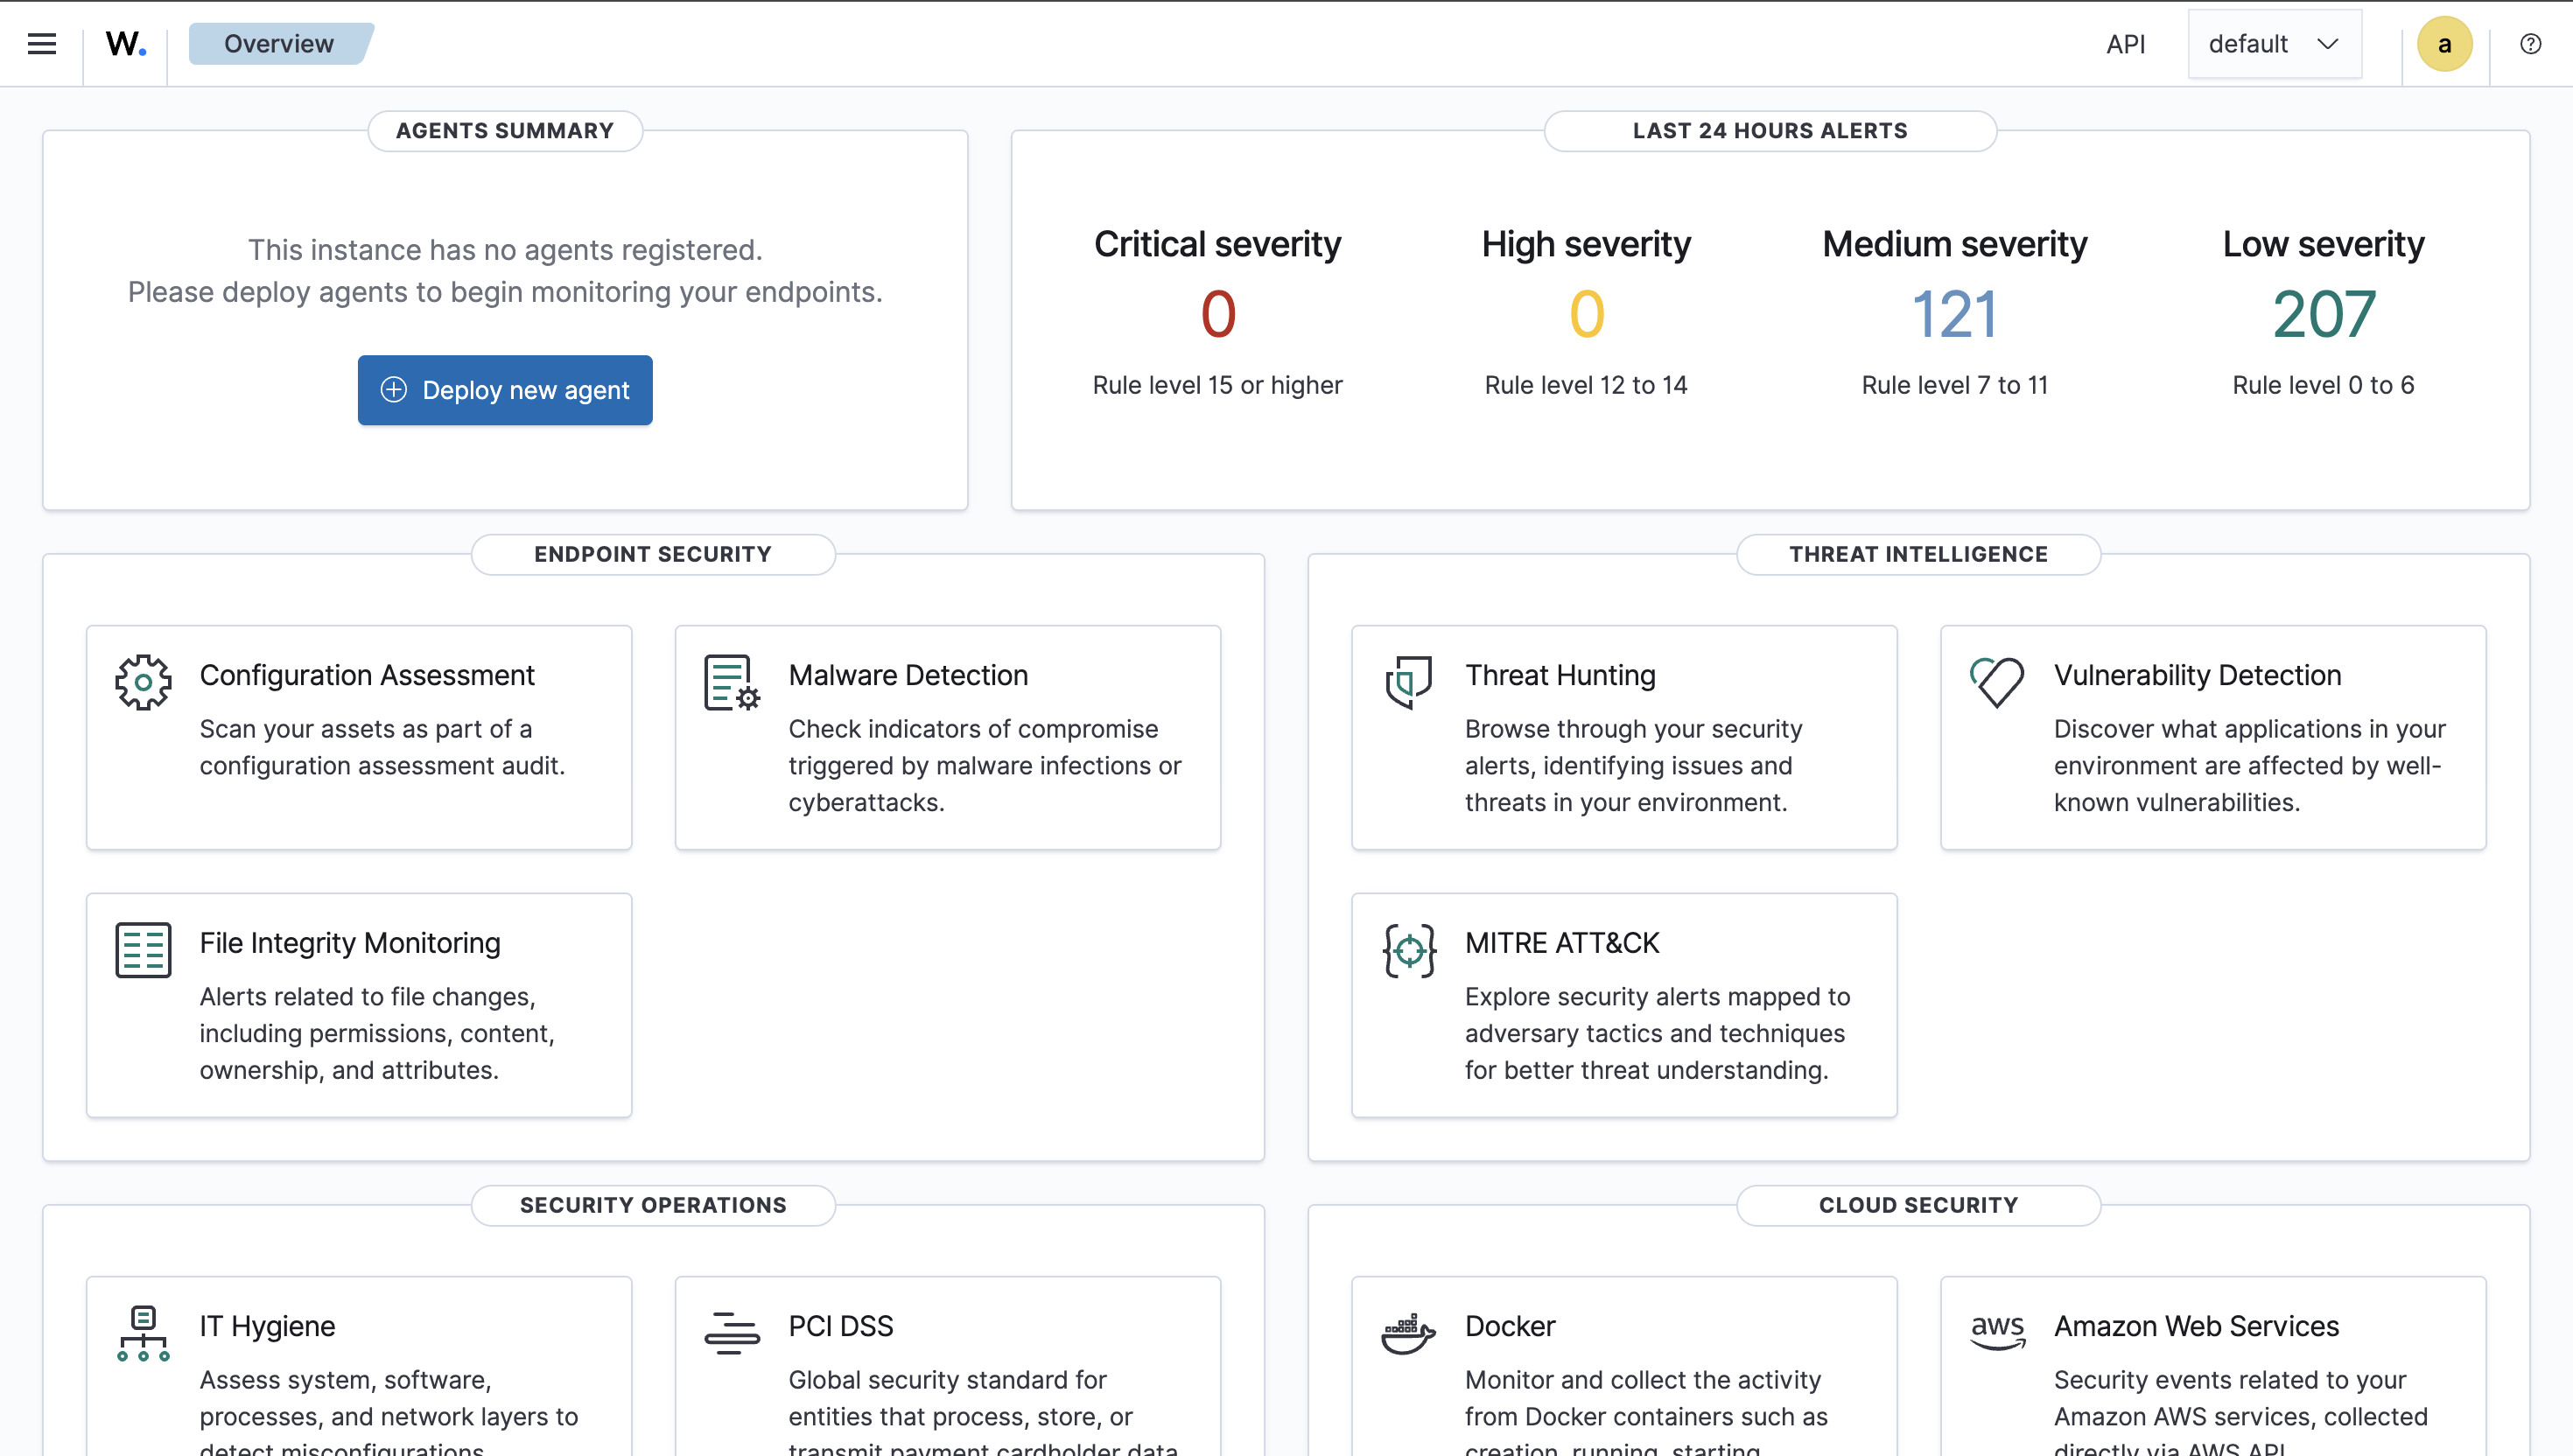
Allow connection from VPS2(Honeypot) to VPS1(Wazuh Server)
- In VPS1, allow access from agent
sudo ufw allow from <HONEYPOT_PUBLIC_IP> to any port 1514 proto tcp
sudo ufw allow from <HONEYPOT_PUBLIC_IP> to any port 1515 proto tcp
sudo ufw status verbose
VPS2(Honeypot) SSH Setting
- Change actual SSH port to 22222
sudo cp /etc/ssh/sshd_config /etc/ssh/sshd_config.bak
sudo sed -i 's/^#Port 22/Port 22222/' /etc/ssh/sshd_config

sudo sshd -t

sudo ufw allow 22222/tcp

sudo systemctl restart ssh
- Don’t close current terminal. Open another new terminal and try log in via
ssh -p 22222. Check if you’re able to login via port 22222. Otherwise you’ll lock yourself
Install Cowrie on VPS2(Honeypot)
- Install dependencies
sudo apt-get update
sudo apt-get install -y git python3-pip python3-venv libssl-dev libffi-dev build-essential libpython3-dev python3-minimal authbind
- Create a user to run Cowrie. Because we don’t want use
root.
sudo adduser --disabled-password cowrie
- Git clone Cowrie project, use python venv and install pip libs
sudo -u cowrie -H bash -lc '
cd ~
git clone https://github.com/cowrie/cowrie
cd ~/cowrie
python3 -m venv cowrie-env
source cowrie-env/bin/activate
python -m pip install --upgrade pip
python -m pip install -e .
'
- Change the port which Cowrie uses
sudo touch /etc/authbind/byport/22
sudo chown cowrie:cowrie /etc/authbind/byport/22
sudo chmod 770 /etc/authbind/byport/22

sudo -u cowrie -H bash -lc 'cat > /home/cowrie/cowrie/etc/cowrie.cfg << "EOF"
[ssh]
listen_endpoints = tcp:22:interface=0.0.0.0
EOF'
- Allow inbound 22/tcp in VPS2(Honeypot)
sudo ufw allow 22/tcp
sudo ufw status verbose
- Run Cowrie
sudo -u cowrie -H bash -lc '
cd /home/cowrie/cowrie
source cowrie-env/bin/activate
AUTHBIND_ENABLED=yes cowrie start
'
- Check logs on Cowrie
sudo -u cowrie -H bash -lc 'cd /home/cowrie/cowrie && tail -n 50 var/log/cowrie/cowrie.log'
sudo ss -lntp | grep ':22'
Install Wazuh Agent
- Add Wazuh repo
sudo apt-get install -y gnupg apt-transport-https
curl -s https://packages.wazuh.com/key/GPG-KEY-WAZUH | \
  sudo gpg --no-default-keyring --keyring gnupg-ring:/usr/share/keyrings/wazuh.gpg --import
sudo chmod 644 /usr/share/keyrings/wazuh.gpg
echo "deb [signed-by=/usr/share/keyrings/wazuh.gpg] https://packages.wazuh.com/4.x/apt/ stable main" | \
  sudo tee /etc/apt/sources.list.d/wazuh.list
sudo apt-get update
- Install wazuh-agent. Note that
<WAZUH_SERVER_IP>should be replaced with your VPS1 public IP.
sudo WAZUH_MANAGER="<WAZUH_SERVER_IP>" apt-get install -y wazuh-agent
sudo systemctl daemon-reload
sudo systemctl enable wazuh-agent
sudo systemctl start wazuh-agent
- Check the status and logs of wazuh-agent
sudo systemctl status wazuh-agent
sudo journalctl -u wazuh-agent -n 50
Connect Cowrie with Wazuh-Agent
- Add cowrie JSON output file to wazuh-agent
sudo vim /var/ossec/etc/ossec.conf
# Add the following to /var/ossec/etc/ossec.conf
<localfile>
  <location>/home/cowrie/cowrie/var/log/cowrie/cowrie.json*</location>
  <log_format>json</log_format>
  <label key="cowrie_source">cowrie</label>
</localfile>
- Restart the service
sudo systemctl restart wazuh-agent
sudo systemctl status wazuh-agent
Examination
This process is the most difficult and annoying part because you may encounter many issues depending on individual settings. I can provide several issues that I encountered during this examination process.
-
Check Wazuh-Server Dashboard on VPS1 You should go check out the dashboard on VPS1 via
https://VPS1_PUBLIC_IP, login in, and check the top left corner which describes the connected agents. If there’s no agent there, it means something goes wrong.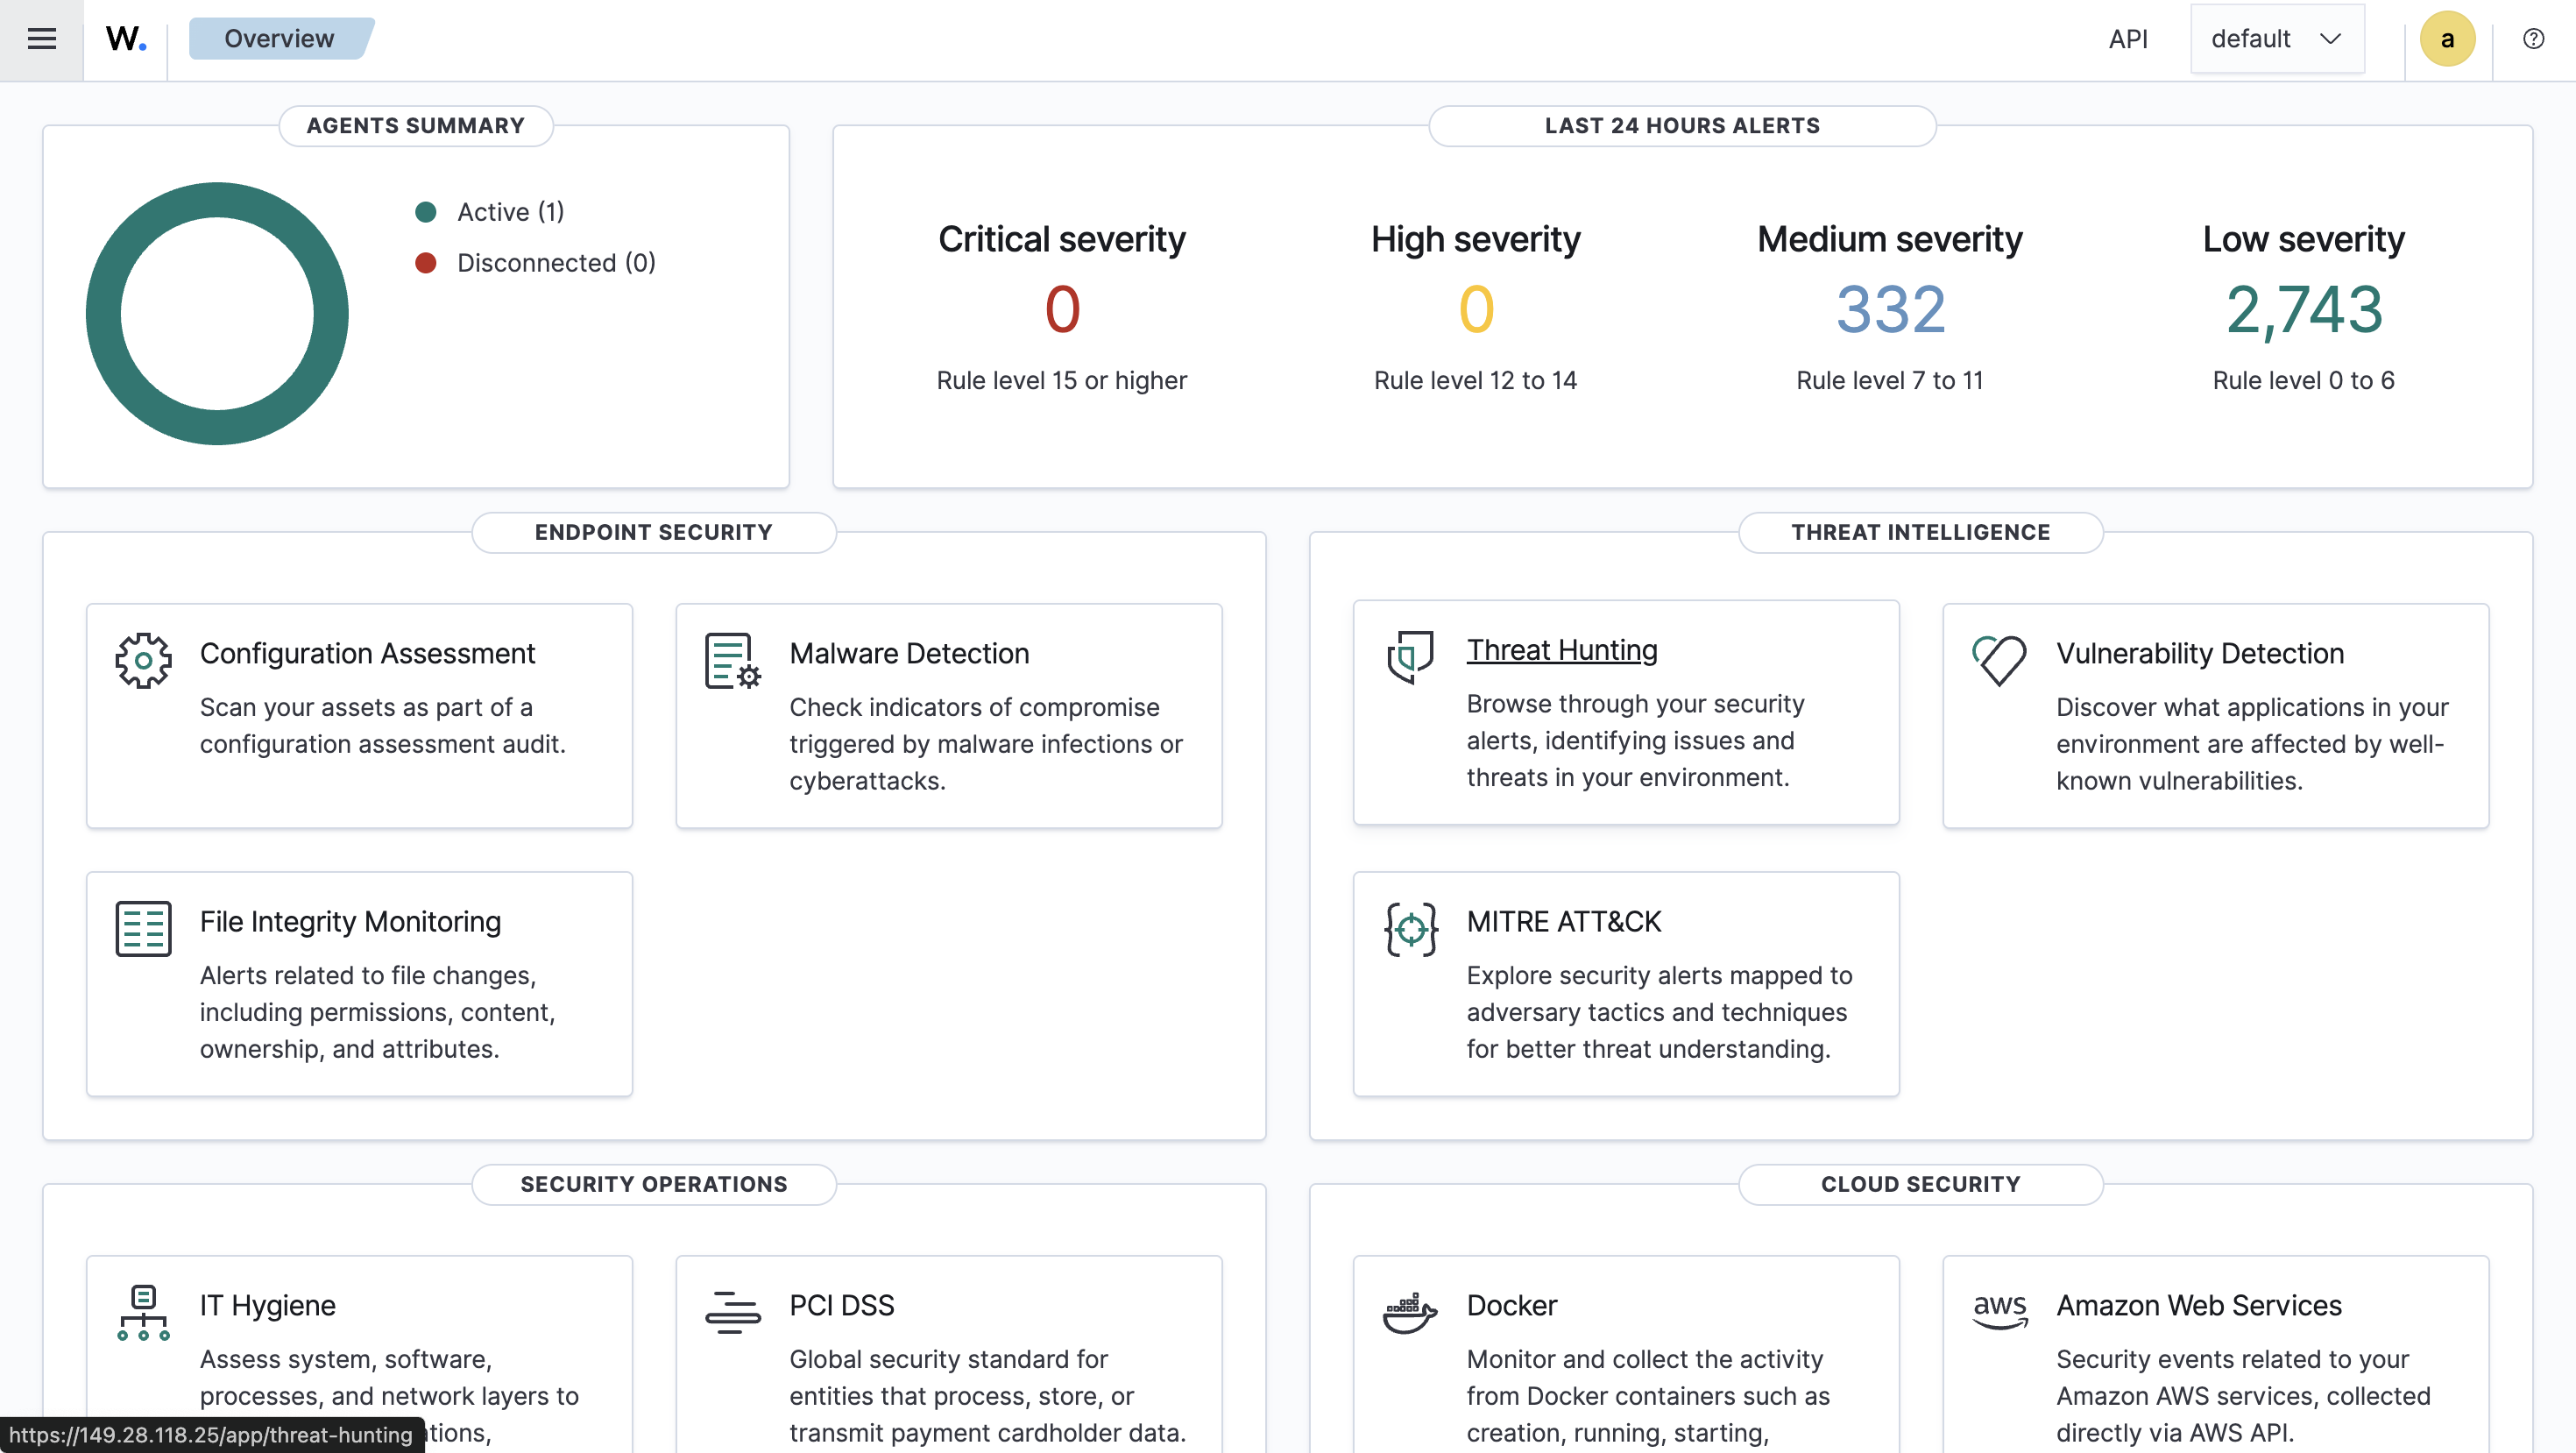
-
Check on VPS2
# Check the logs first
journalctl -u wazuh-agent -f

# Check the state of wazuh-agent, if it's "pending" means it's trying to connect to the wazuh-server/manager. You may see some error logs in the next step
grep ^status /var/ossec/var/run/wazuh-agentd.state

# Check the detail error logs of wazuh-agent. You may see trying to connect prompts and the root cause. Mine is "Invalid agent name: xxx" which I have two same names as my agent and my manager.
tail -n 100 /var/ossec/logs/ossec.log
- If you have the same problem as mine, do the following on VPS2(honeypot):
- Modify the
/var/ossec/etc/ossec.conffile:
- Modify the
vim /var/ossec/etc/ossec.conf
- Add
<enrollment></enrollment>part which changes the agent name of VPS2. You should replace WAZUH_SERVER_IP_ADDRESS with your actual Wazuh Server IP address(VPS1).
<client>
  <server>
    <address>WAZUH_SERVER_IP_ADDRESS</address>
    <port>1514</port>
    <protocol>tcp</protocol>
  </server>

  <enrollment>
    <enabled>yes</enabled>
    <manager_address>WAZUH_SERVER_IP_ADDRESS</manager_address>
    <port>1515</port>
    <agent_name>cowrie-vps-01</agent_name>
  </enrollment>
</client>
- Restart
wazuh-agentservice again
sudo systemctl restart wazuh-agent
sudo tail -f /var/ossec/logs/ossec.log
- Check on Wazuh Server Dashboard or via CLI:
# You should see new agent's name appeared in the log
sudo /var/ossec/bin/agent_control -l
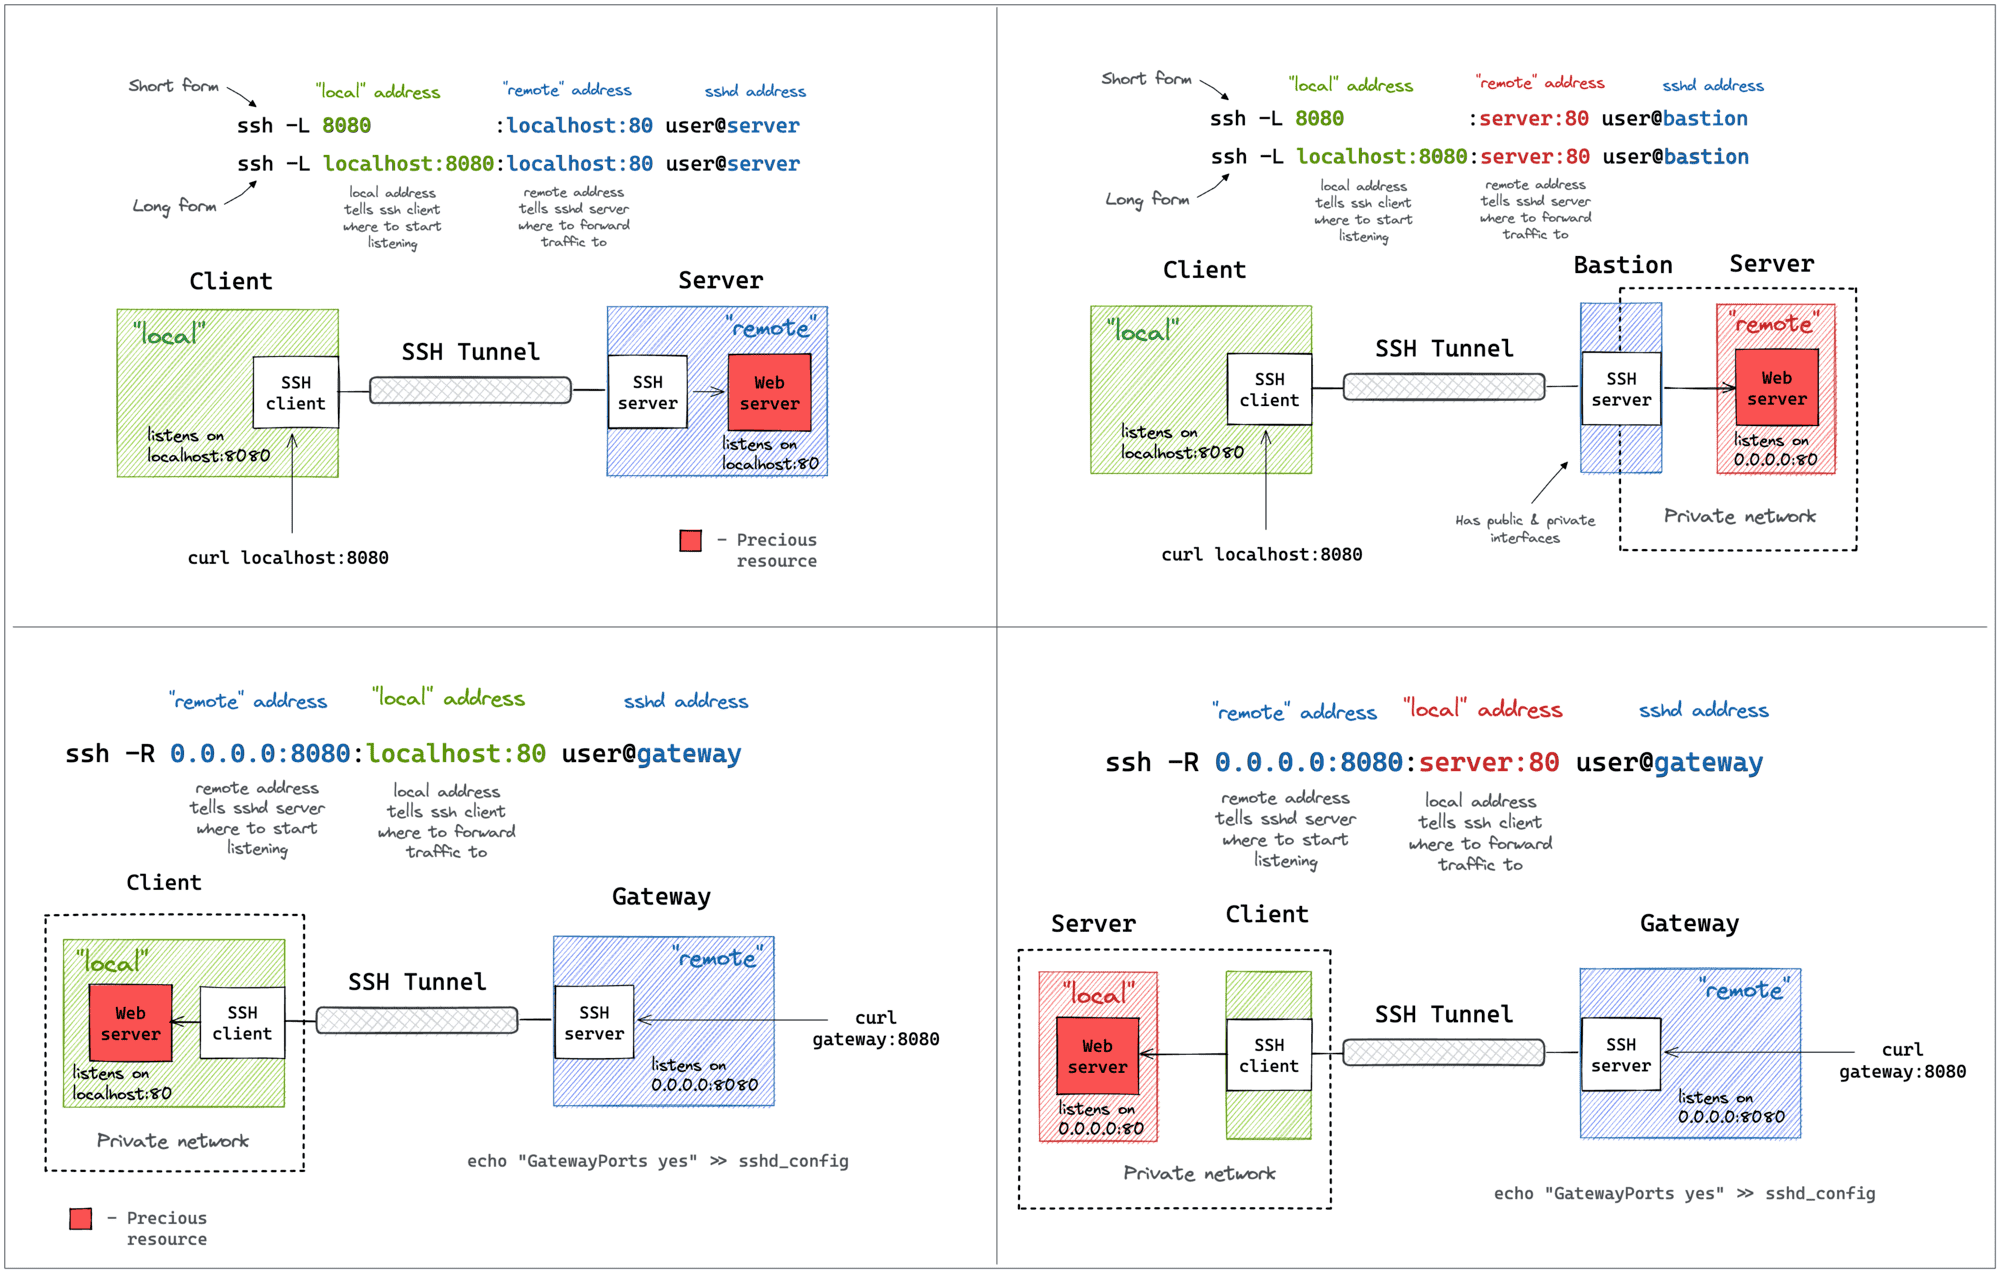
SSH Tunnel
Currently, our Wazuh Manager is exposed to the public which is extremely insecure. We should do something to make it only expose to ourself. We can use SSH tunnel method to achieve that. First, here’s some basic concepts for SSH tunnel.
- Delete ufw 443/tcp rule
sudo ufw status numbered

[ 1] 22/tcp                     ALLOW IN    Anywhere
[ 2] 1514/tcp                   ALLOW IN    216.128.147.148
[ 3] 1515/tcp                   ALLOW IN    216.128.147.148
[ 4] 443/tcp                    ALLOW IN    Anywhere
[ 5] 22/tcp (v6)                ALLOW IN    Anywhere (v6)
[ 6] 443/tcp (v6)               ALLOW IN    Anywhere (v6)

sudo ufw delete 6
sudo ufw delete 4
- Open a SSH tunnel, port forwarding VPS2 443/tcp to our localhost port 8000. Note that this localhost is not either VPS1 or VPS2. It’s the machine that you open Wazuh Manager for monitoring.
ssh root@WAZUH_SERVER_IP -L 8000:localhost:443
- Right now you can test two things. First accessing original exposed
https://HONEYPOT_IP. It’s supposed to be no service which we deny all source to access port 443 using ufw. Second accessing on your localhost usinghttps://localhost:8000which you should be directed to the original Wazuh Manager(Dashboard). By doing this, we could have an extra layer of authentication using ssh to protect our Wazuh Manager. In addtion, if attackers try port/service scanning, it won’t expose to them too.
Result
Right now, we have a Cowrie honeypot running with a Wazuh agent, sending logs to the Wazuh Server(Manager) for analysis and monitoring. This is a great project to enhance the ability for further analyzing cyber attacks or getting some practical experience to build up a comprehensive home lab. I’ll let them running for like a half month to collect the data and will update after that. See ya!
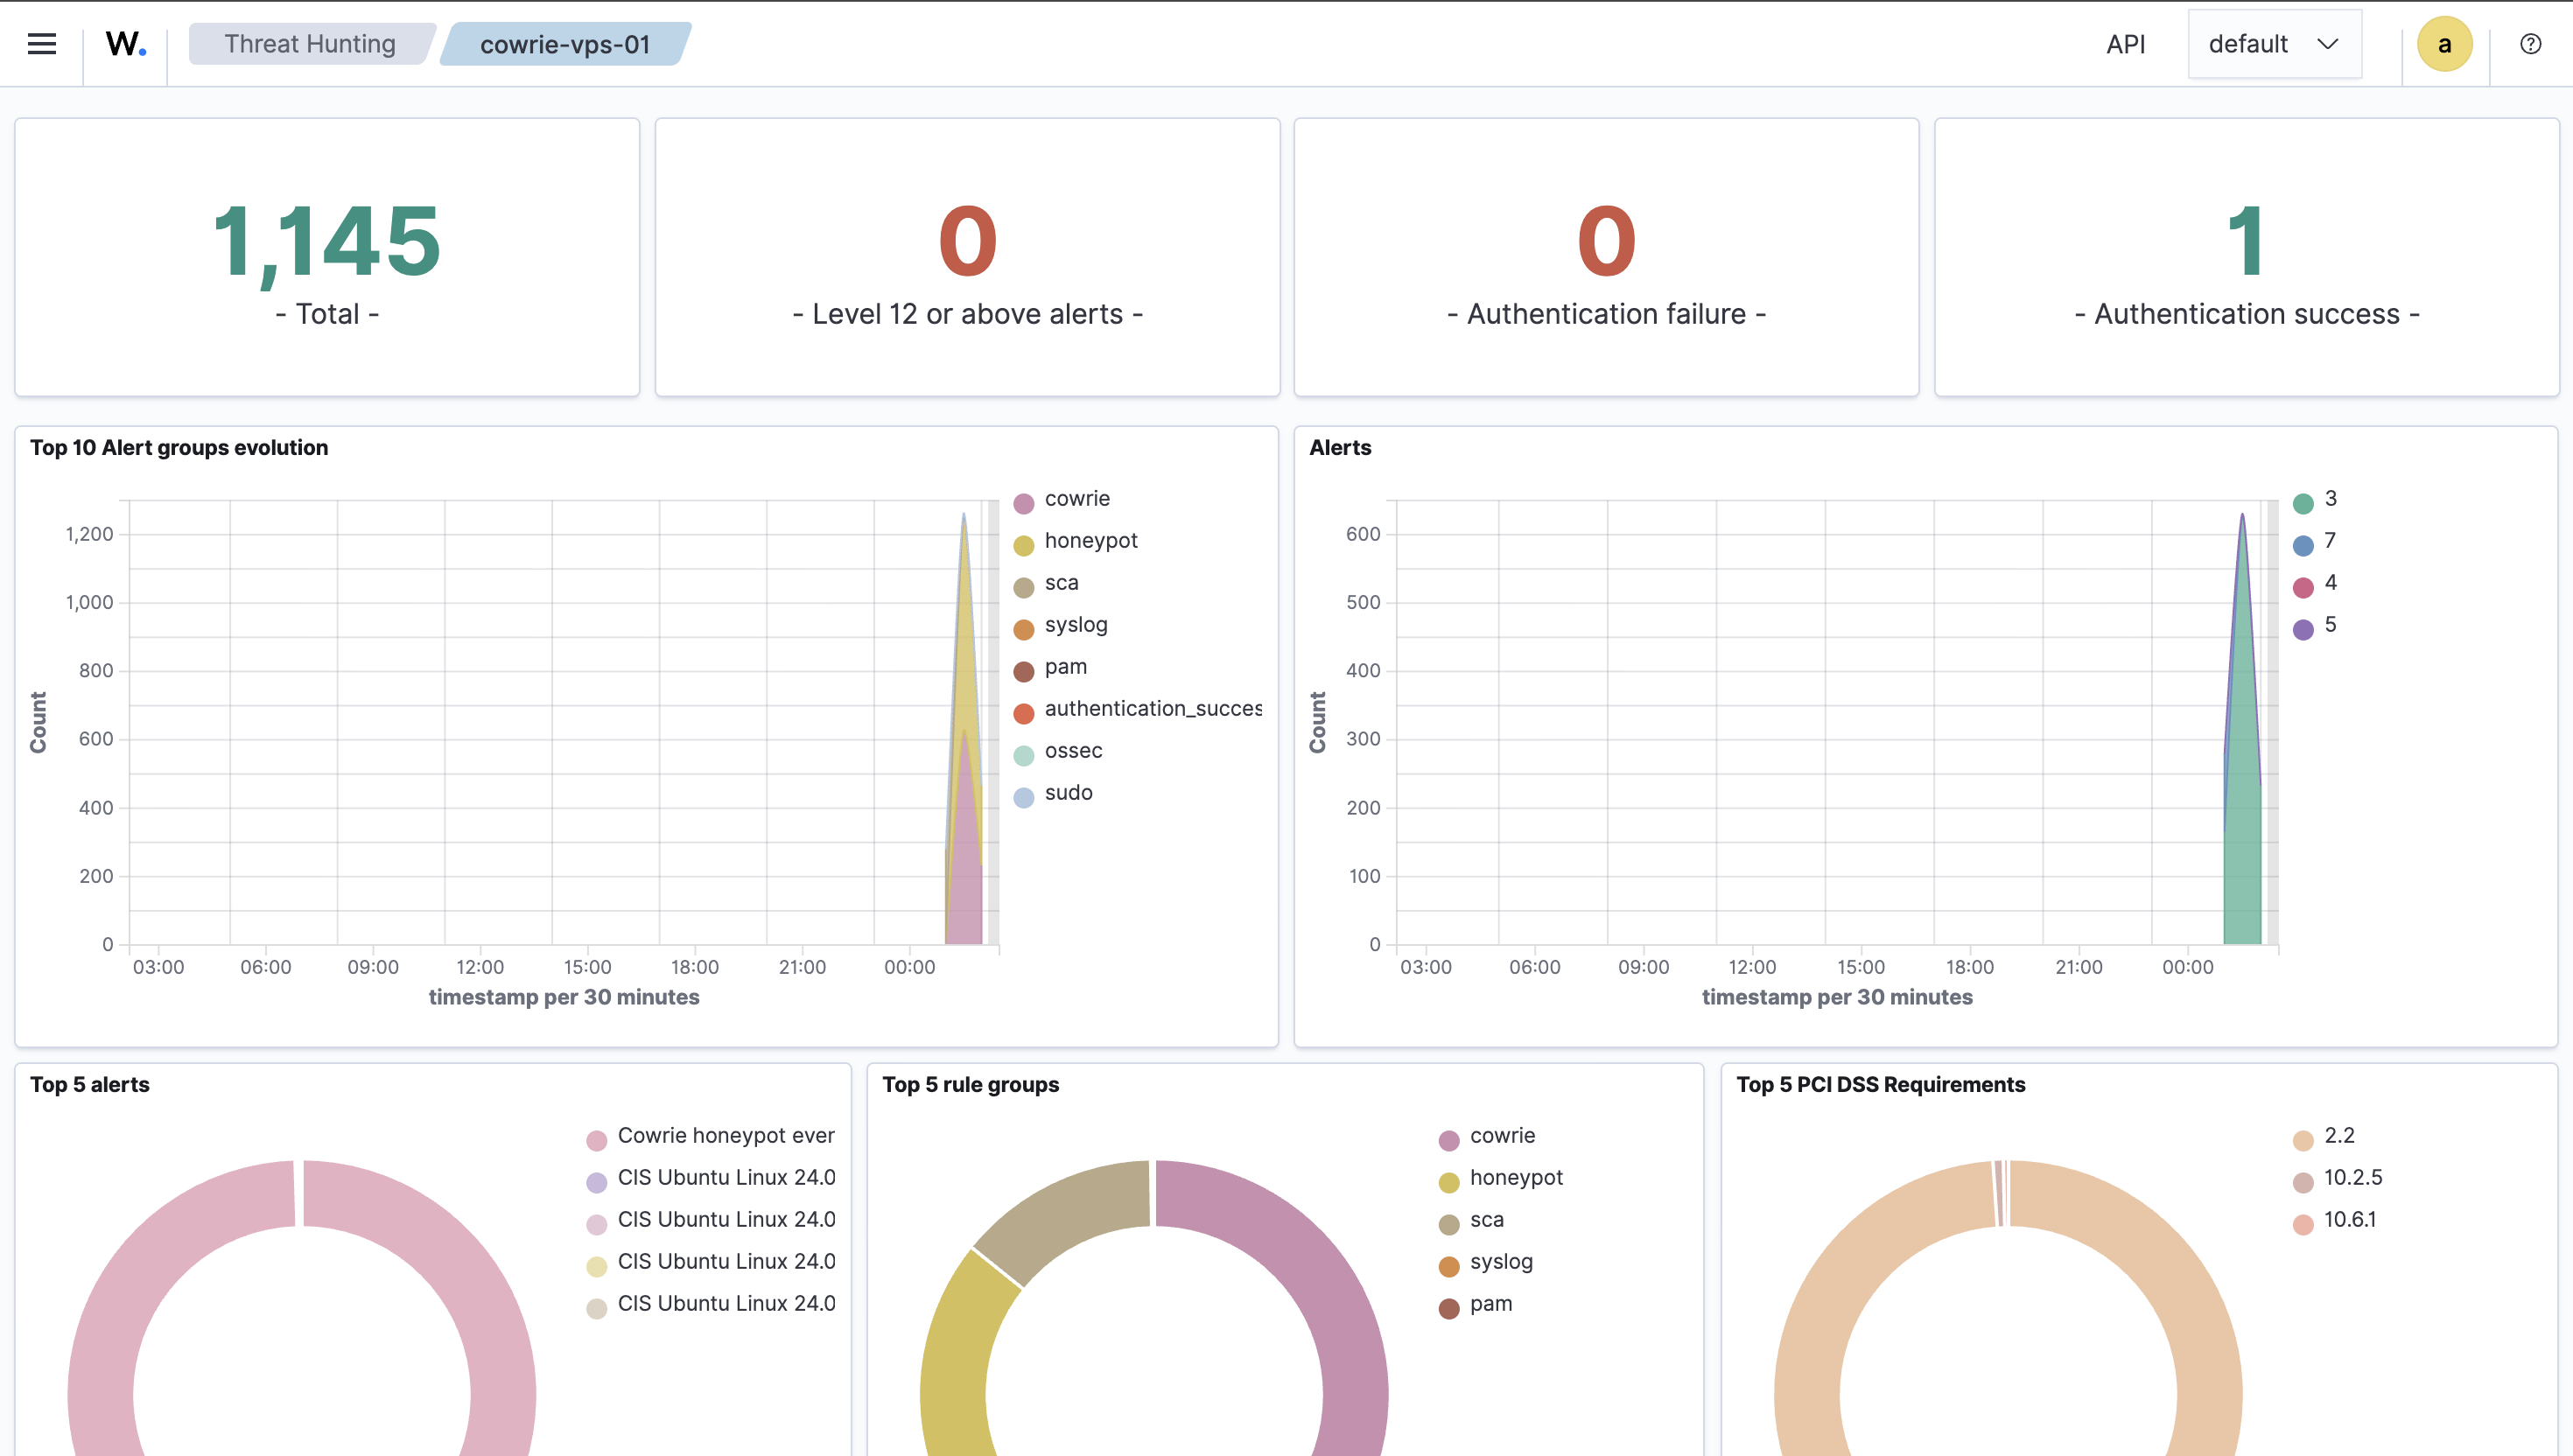
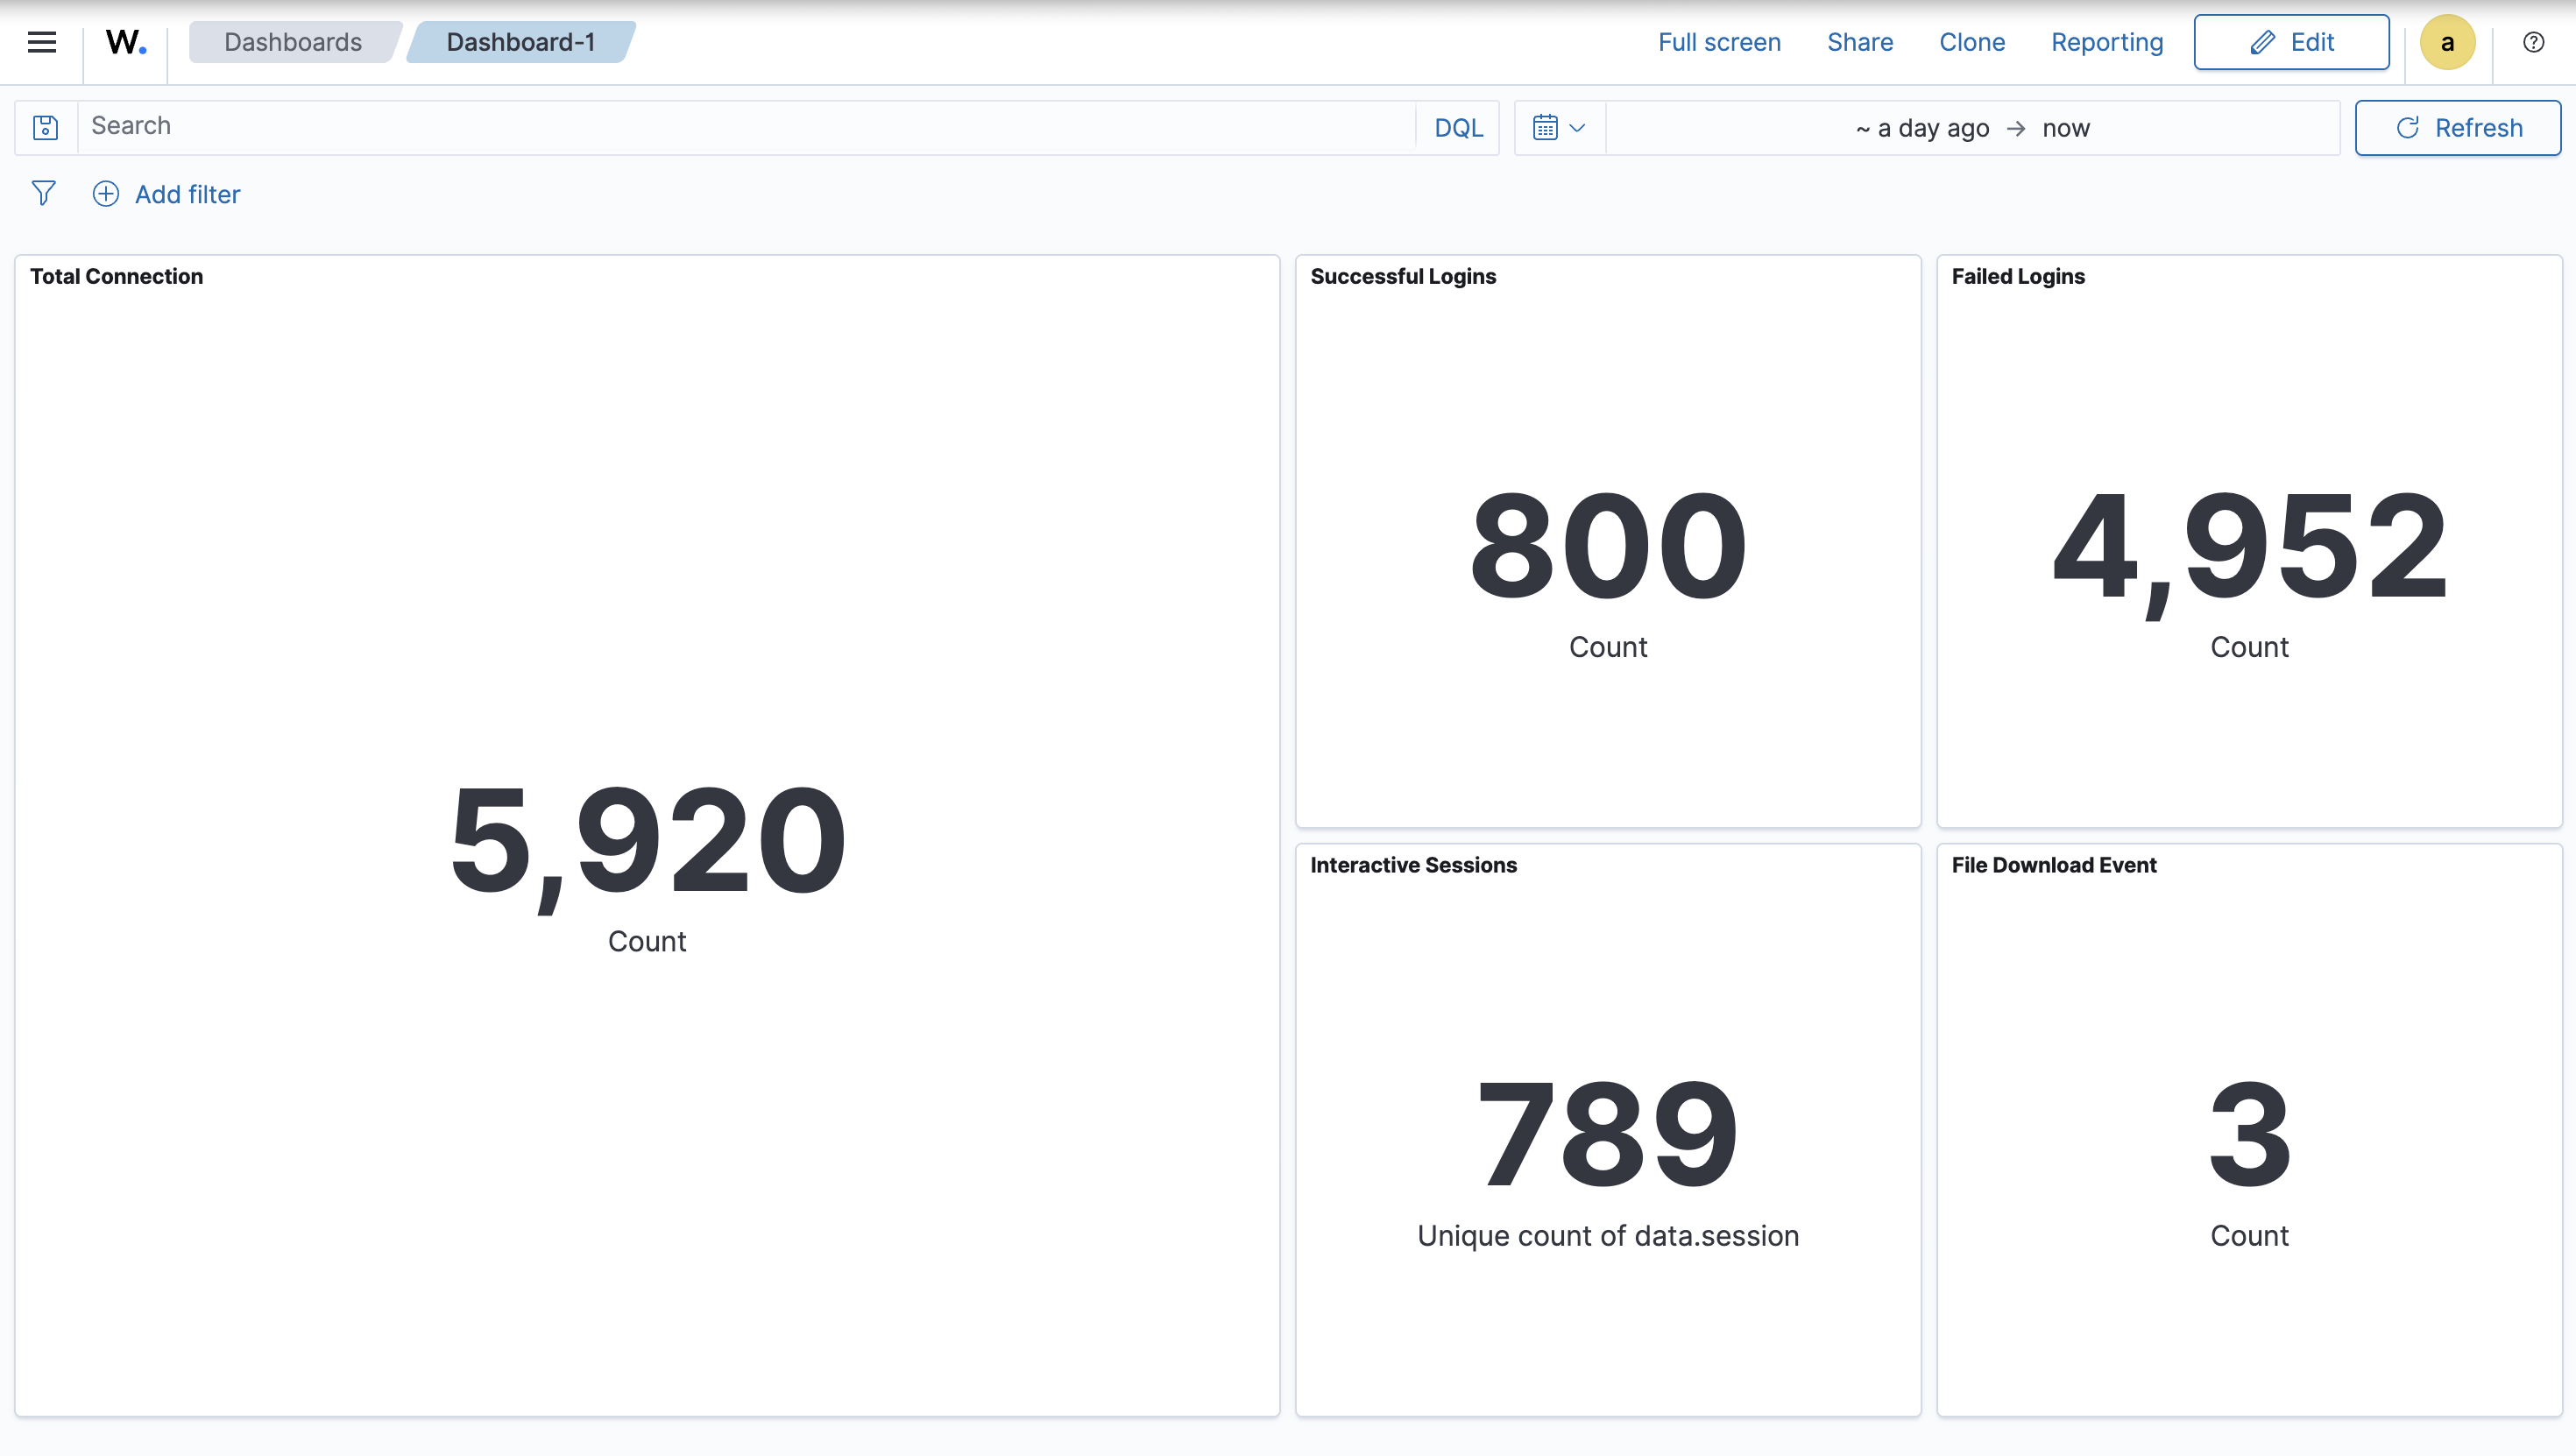
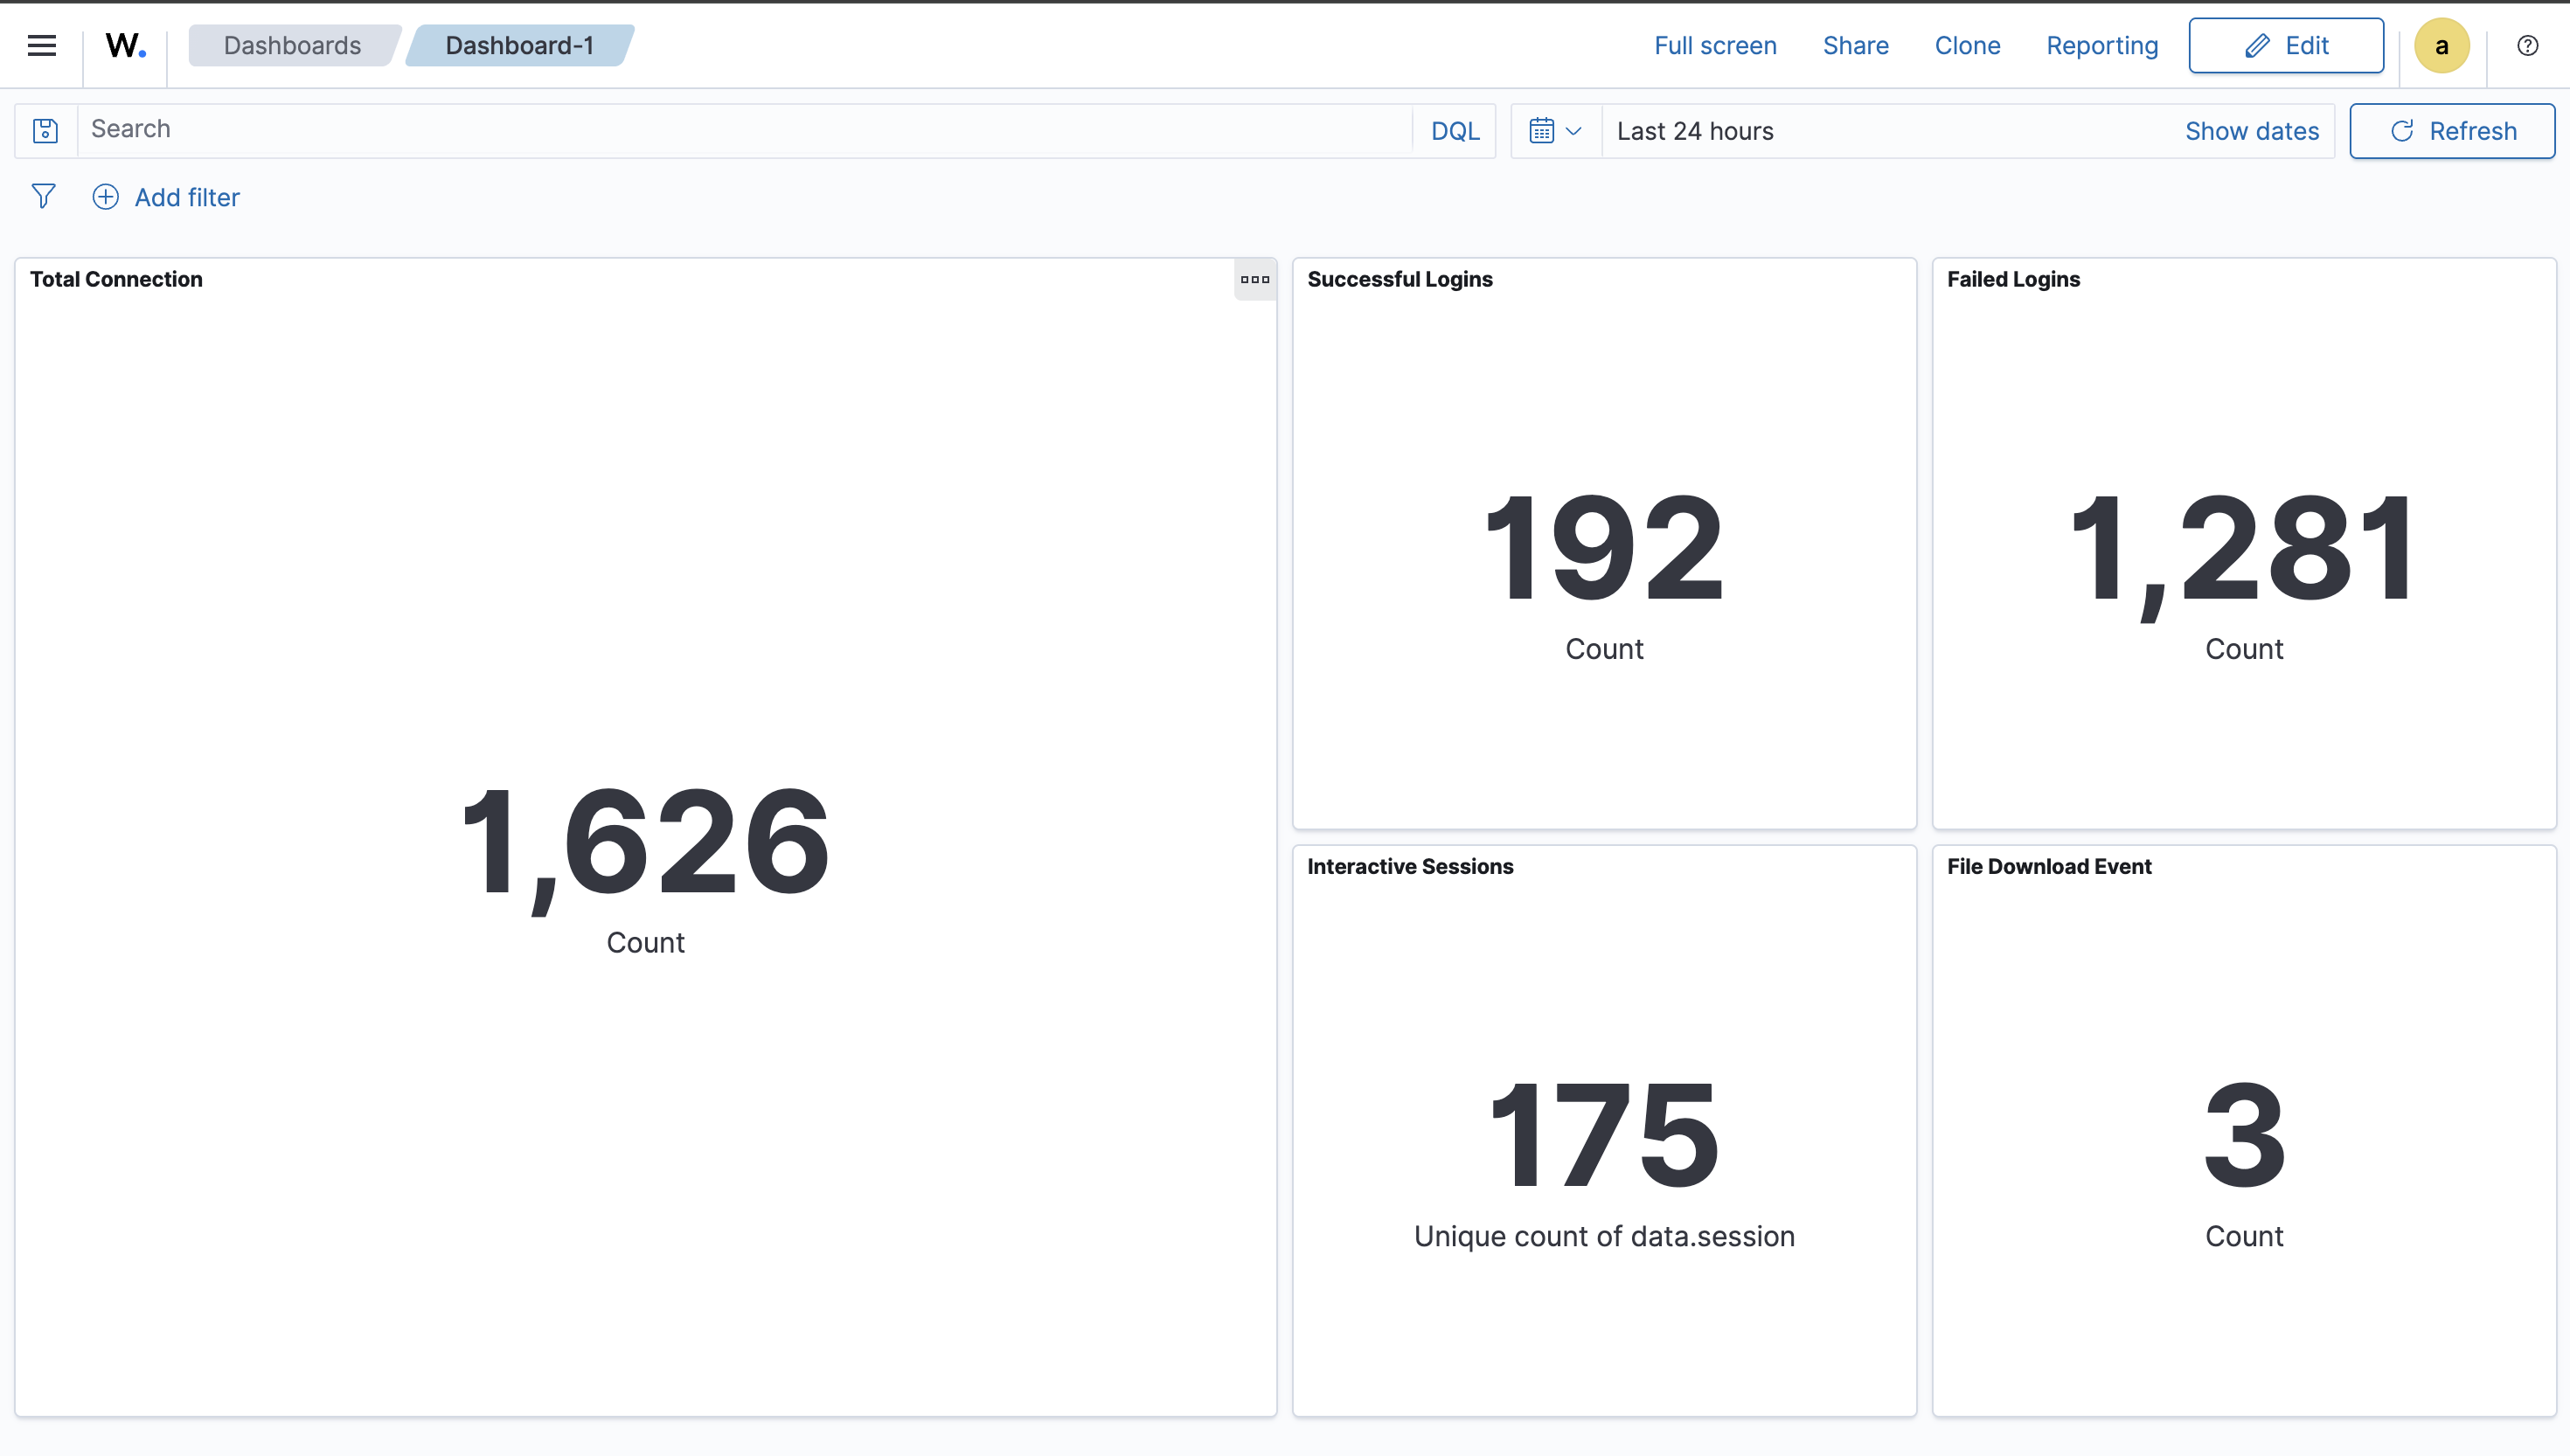
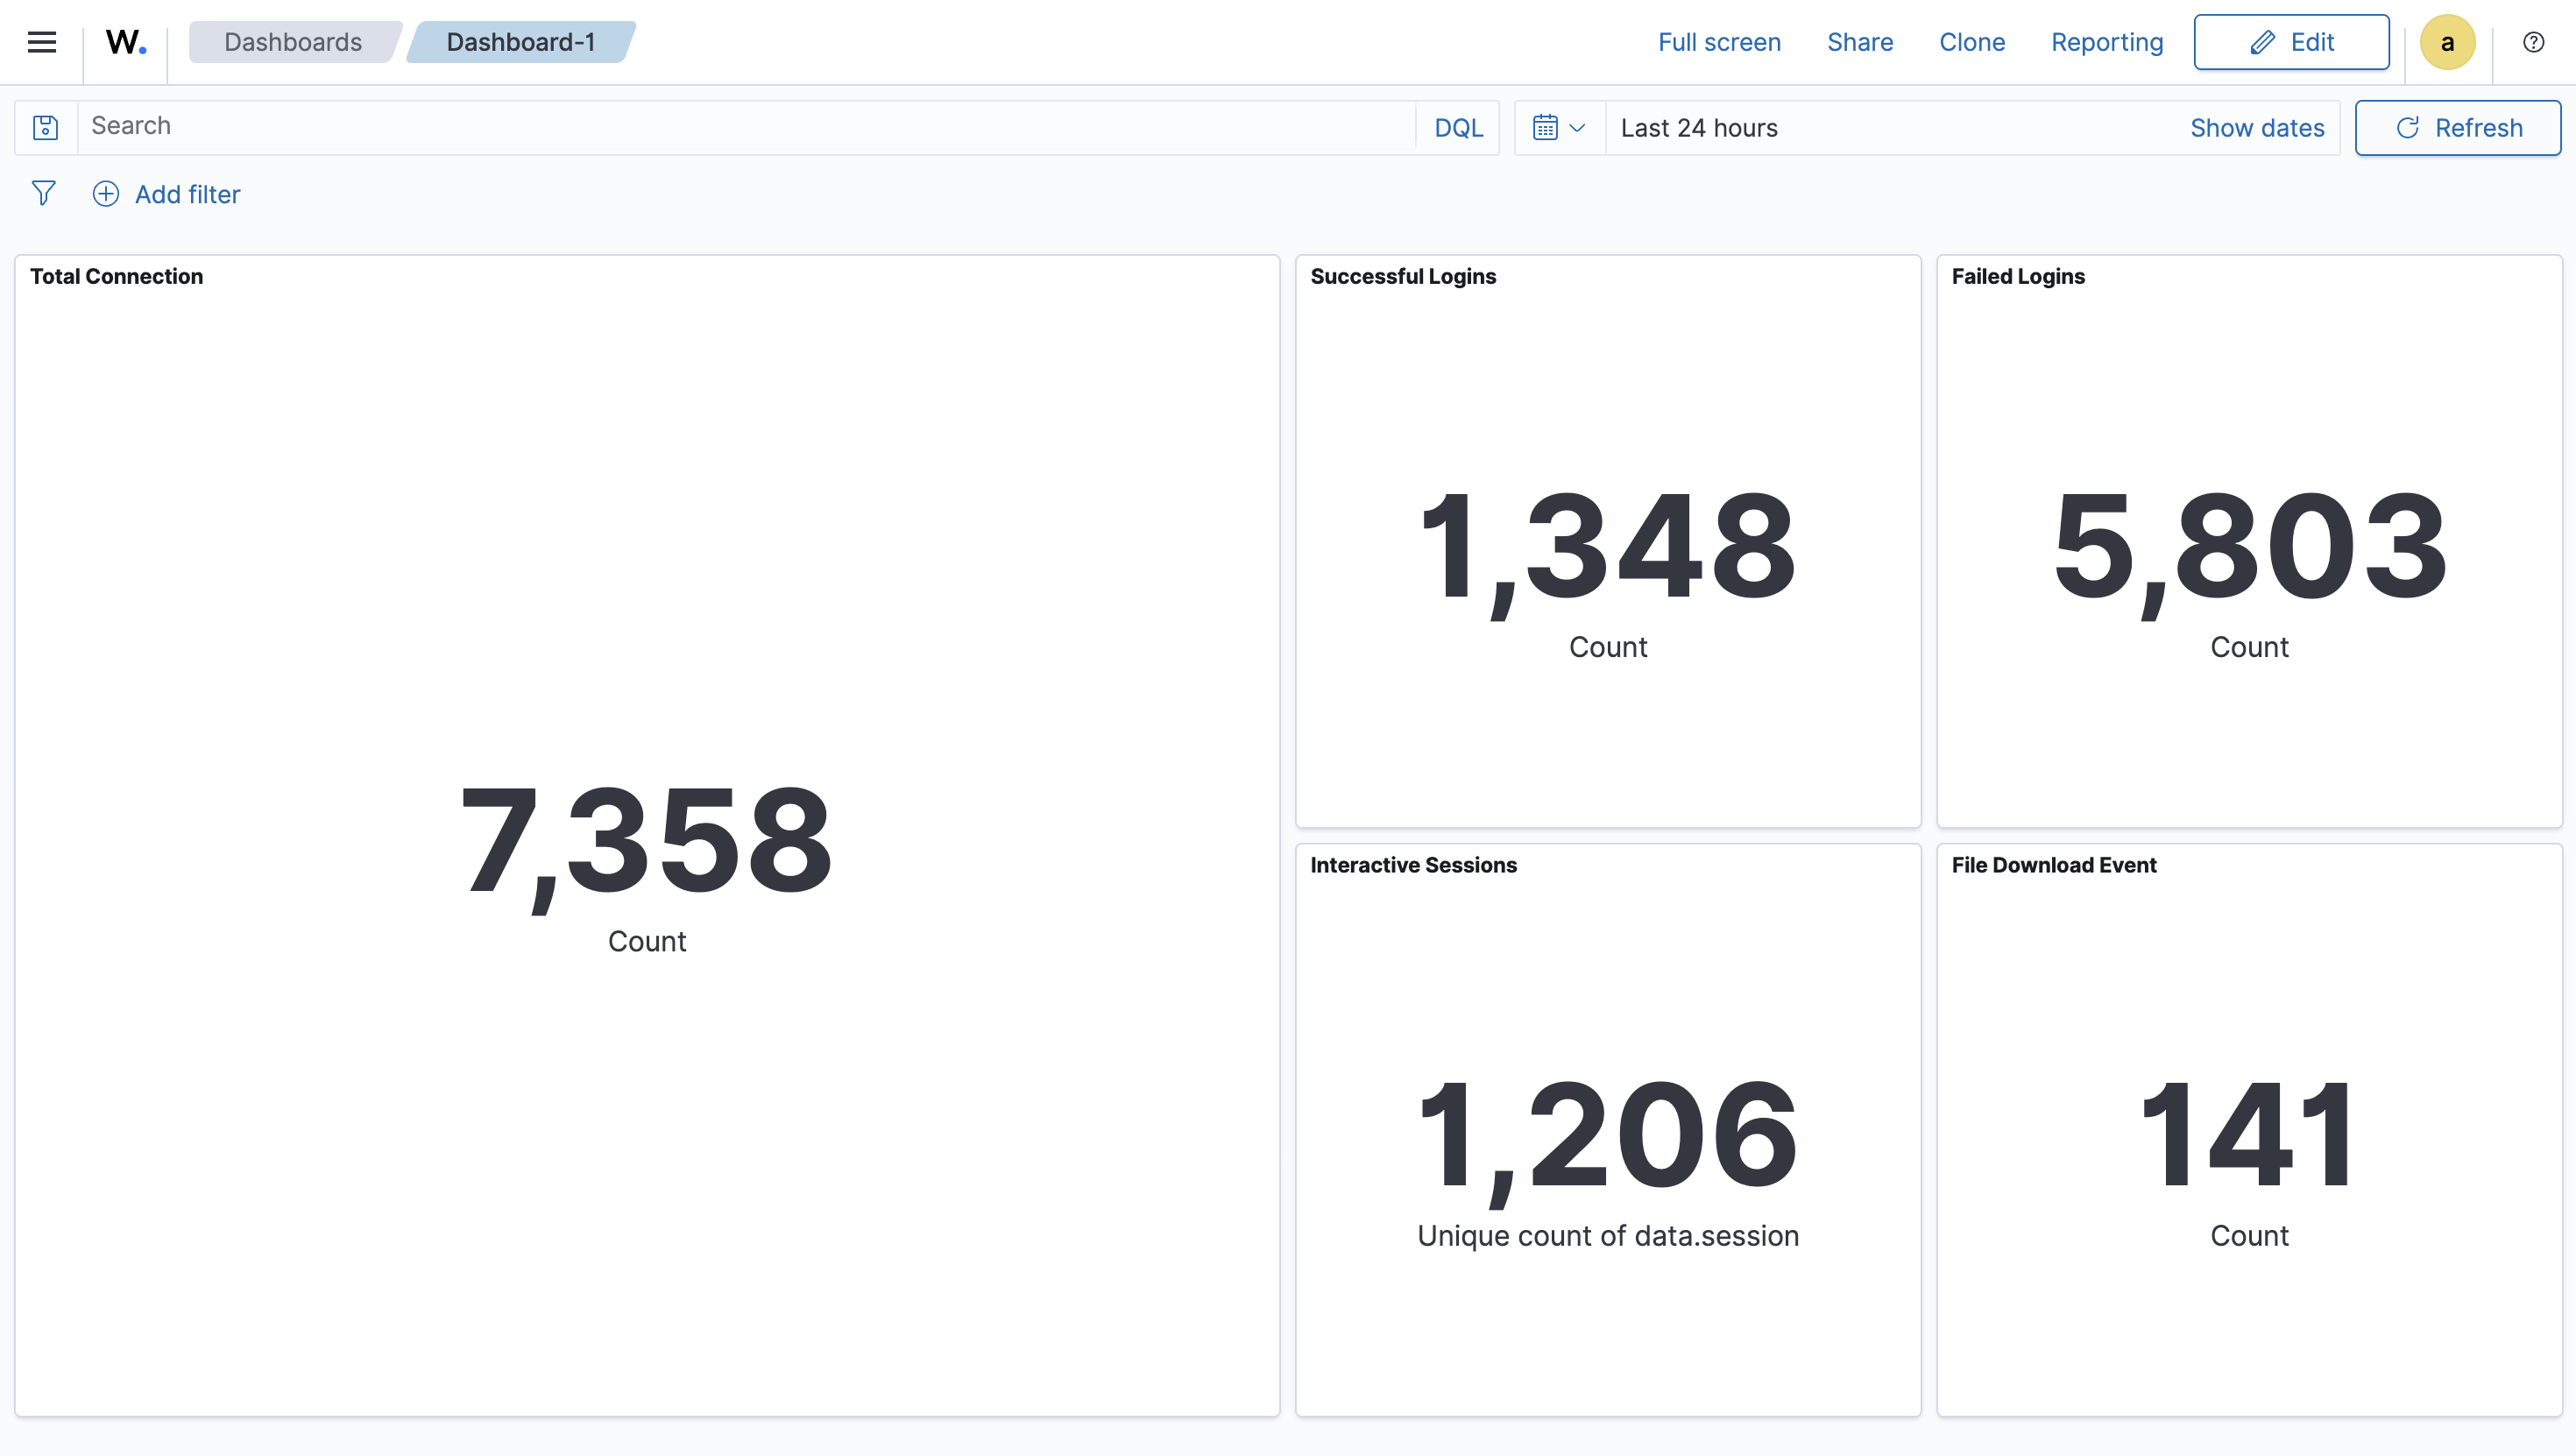
This is the dashboard I’m using. I created fix visualizations including total connections, successful logins, failed logins, unique interacted sessions, and file download events.
| Title | Filter |
|---|---|
| Total connection | agent.name:”cowrie-vps-01” and data.eventid:”cowrie.session.connect” |
| Total successful connection | agent.name:”cowrie-vps-01” and data.eventid:”cowrie.login.success” |
| Total failed connection | agent.name:”cowrie-vps-01” and data.eventid:”cowrie.login.failed” |
| Total unique interacted session | agent.name:”cowrie-vps-01” and data.eventid:”cowrie.command.input” |
| File Download Events | agent.name:”cowrie-vps-01” and data.eventid:”cowrie.session.file_download” |
Day 1
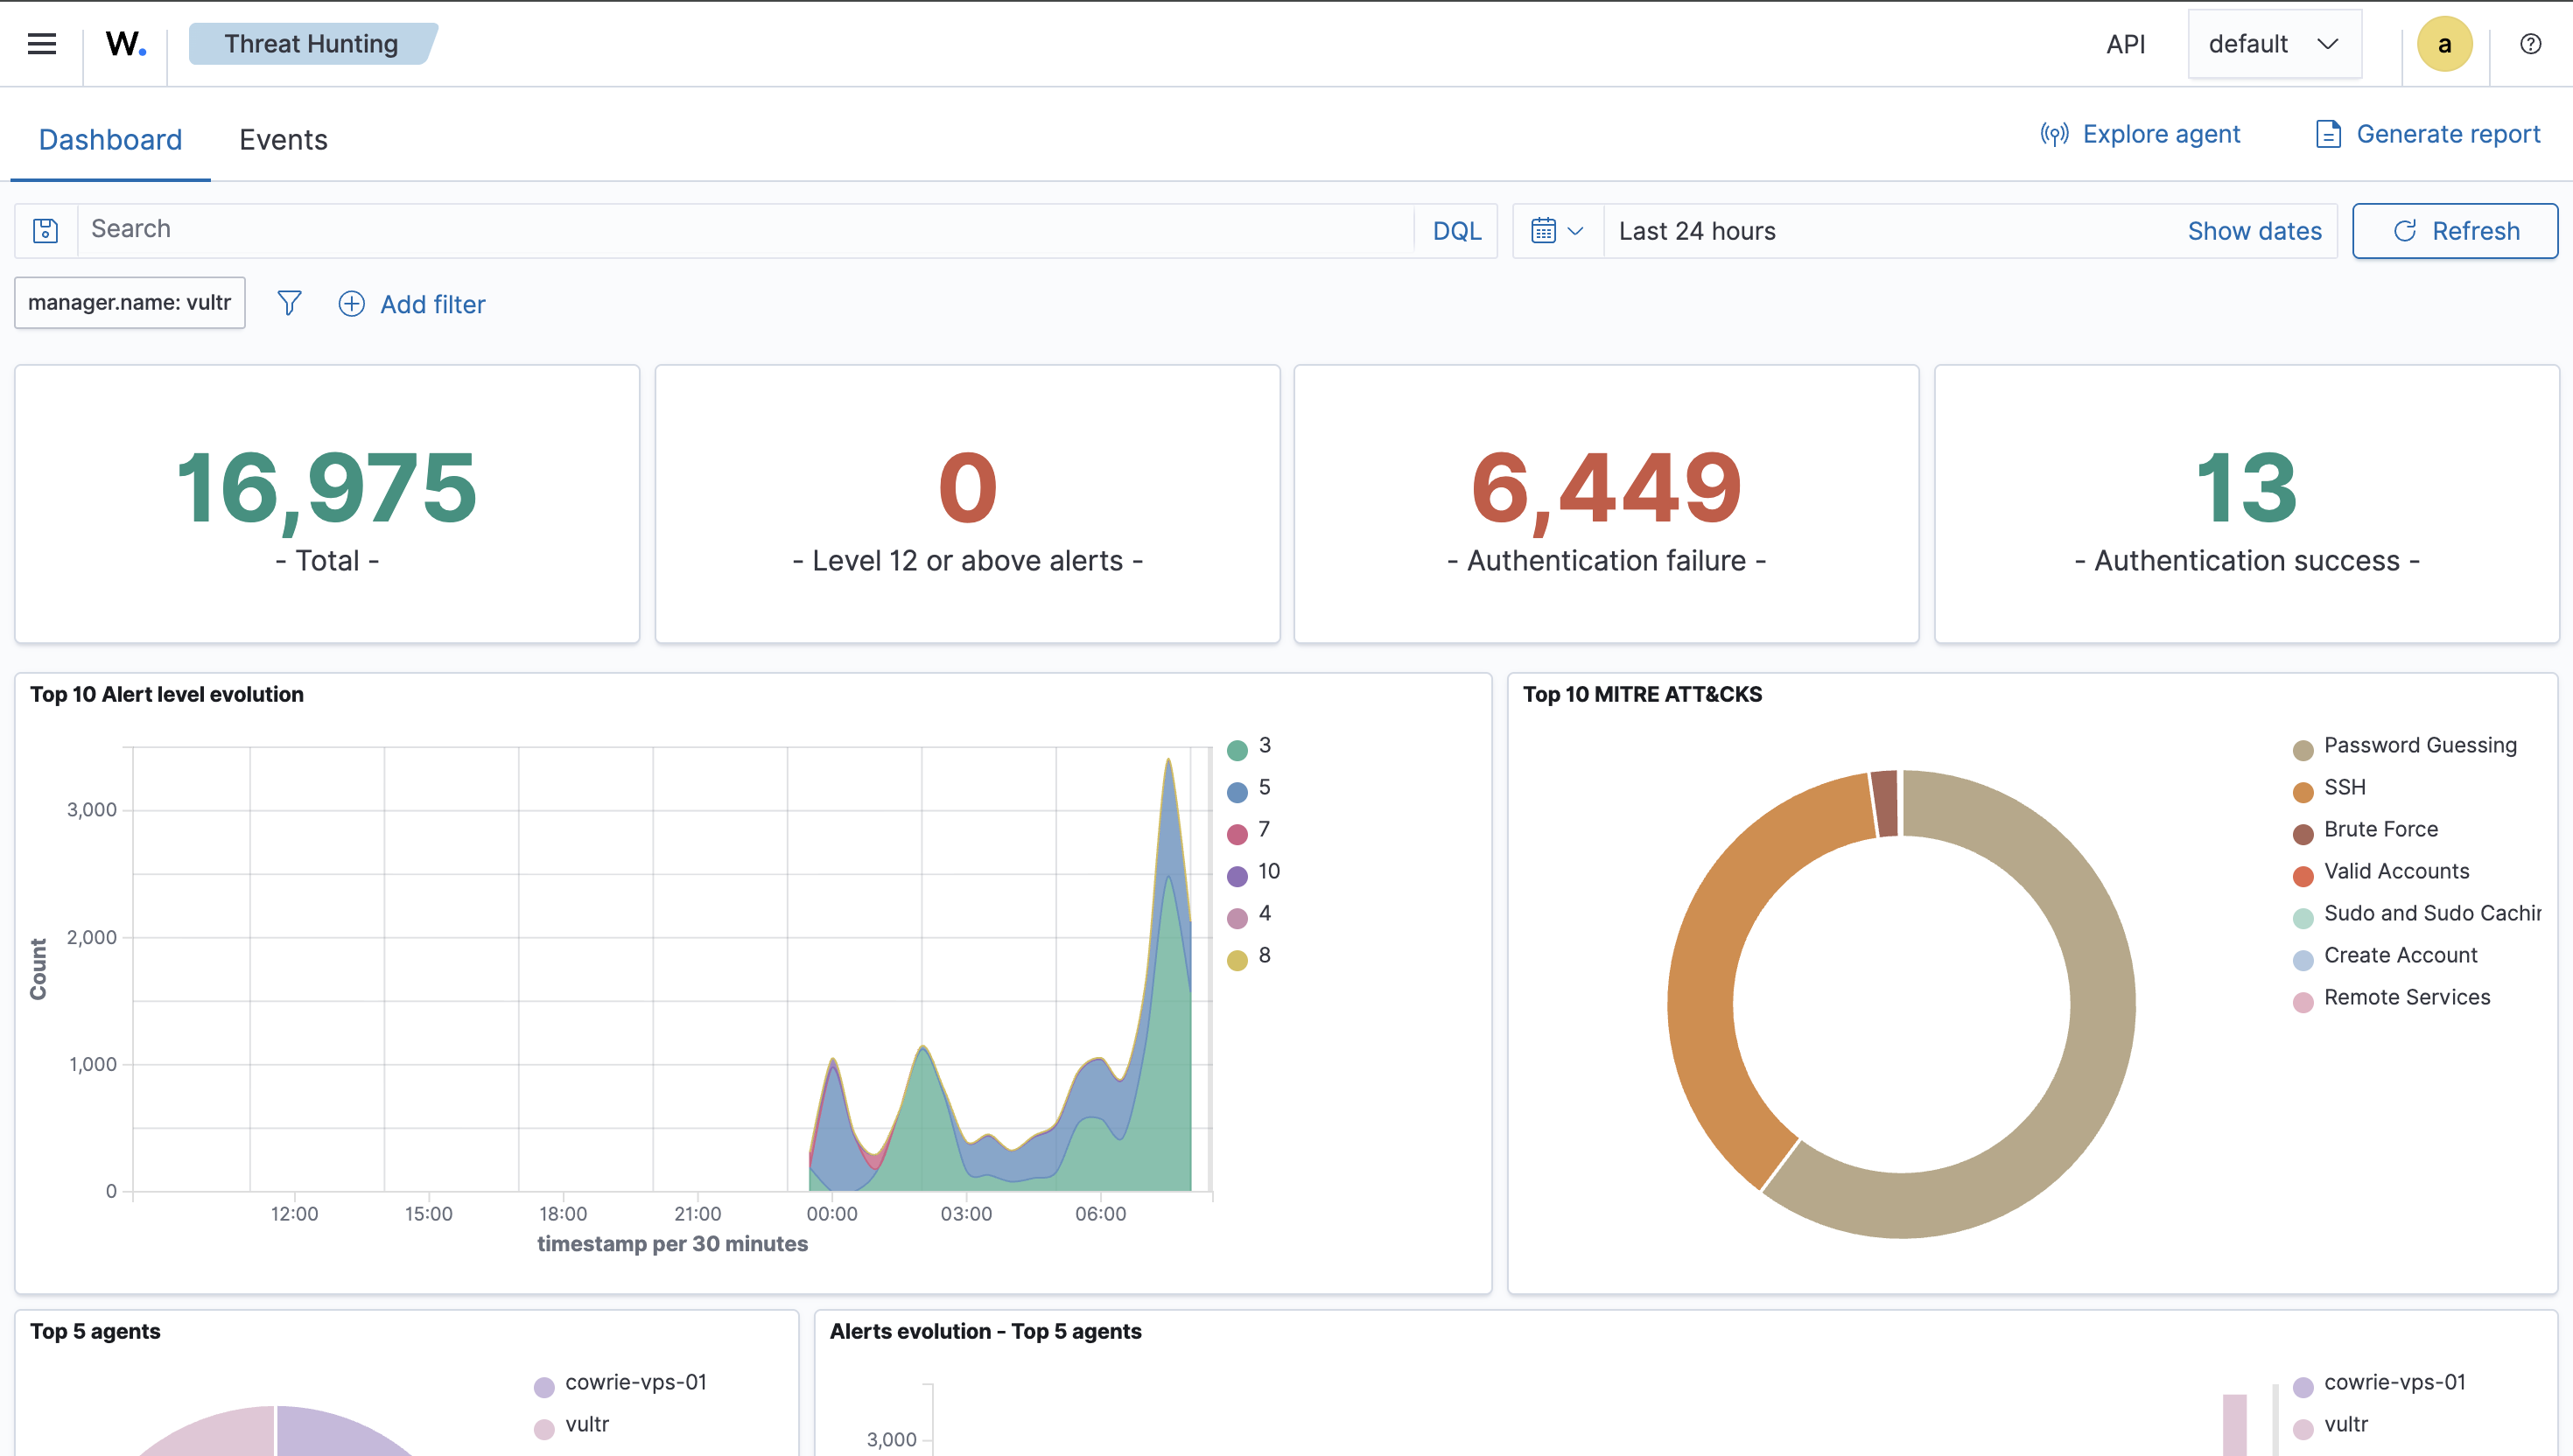
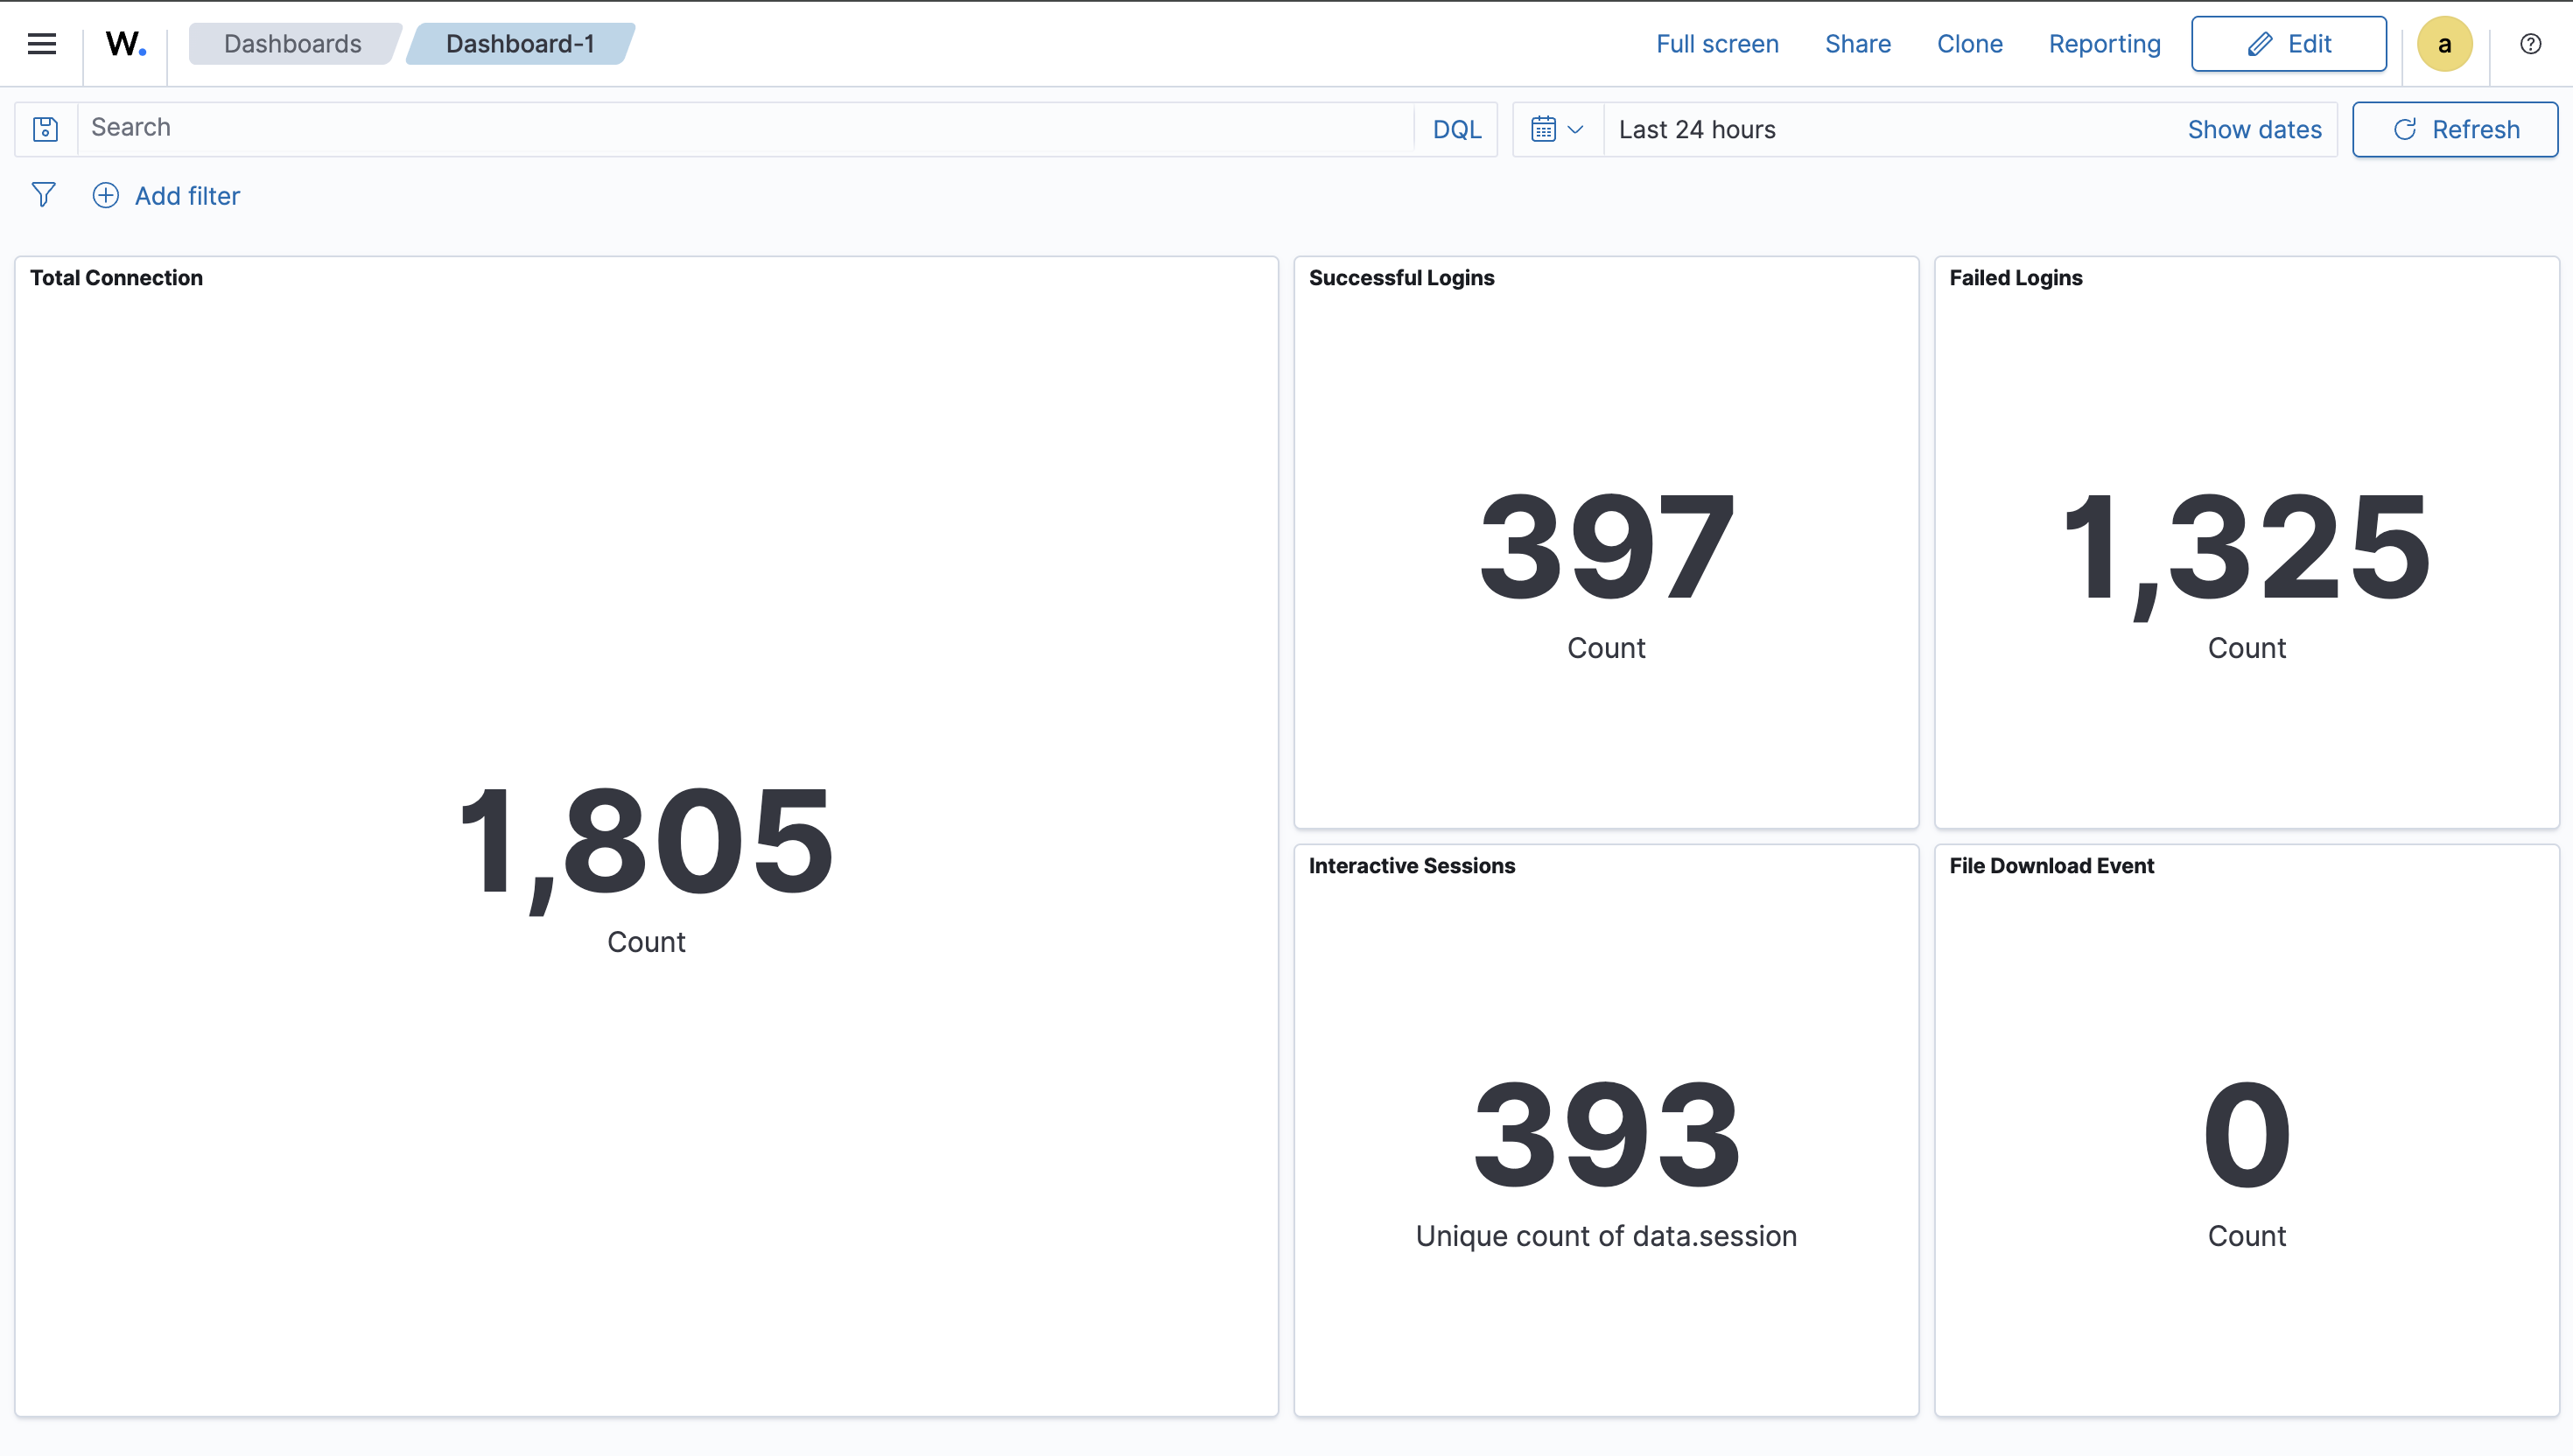
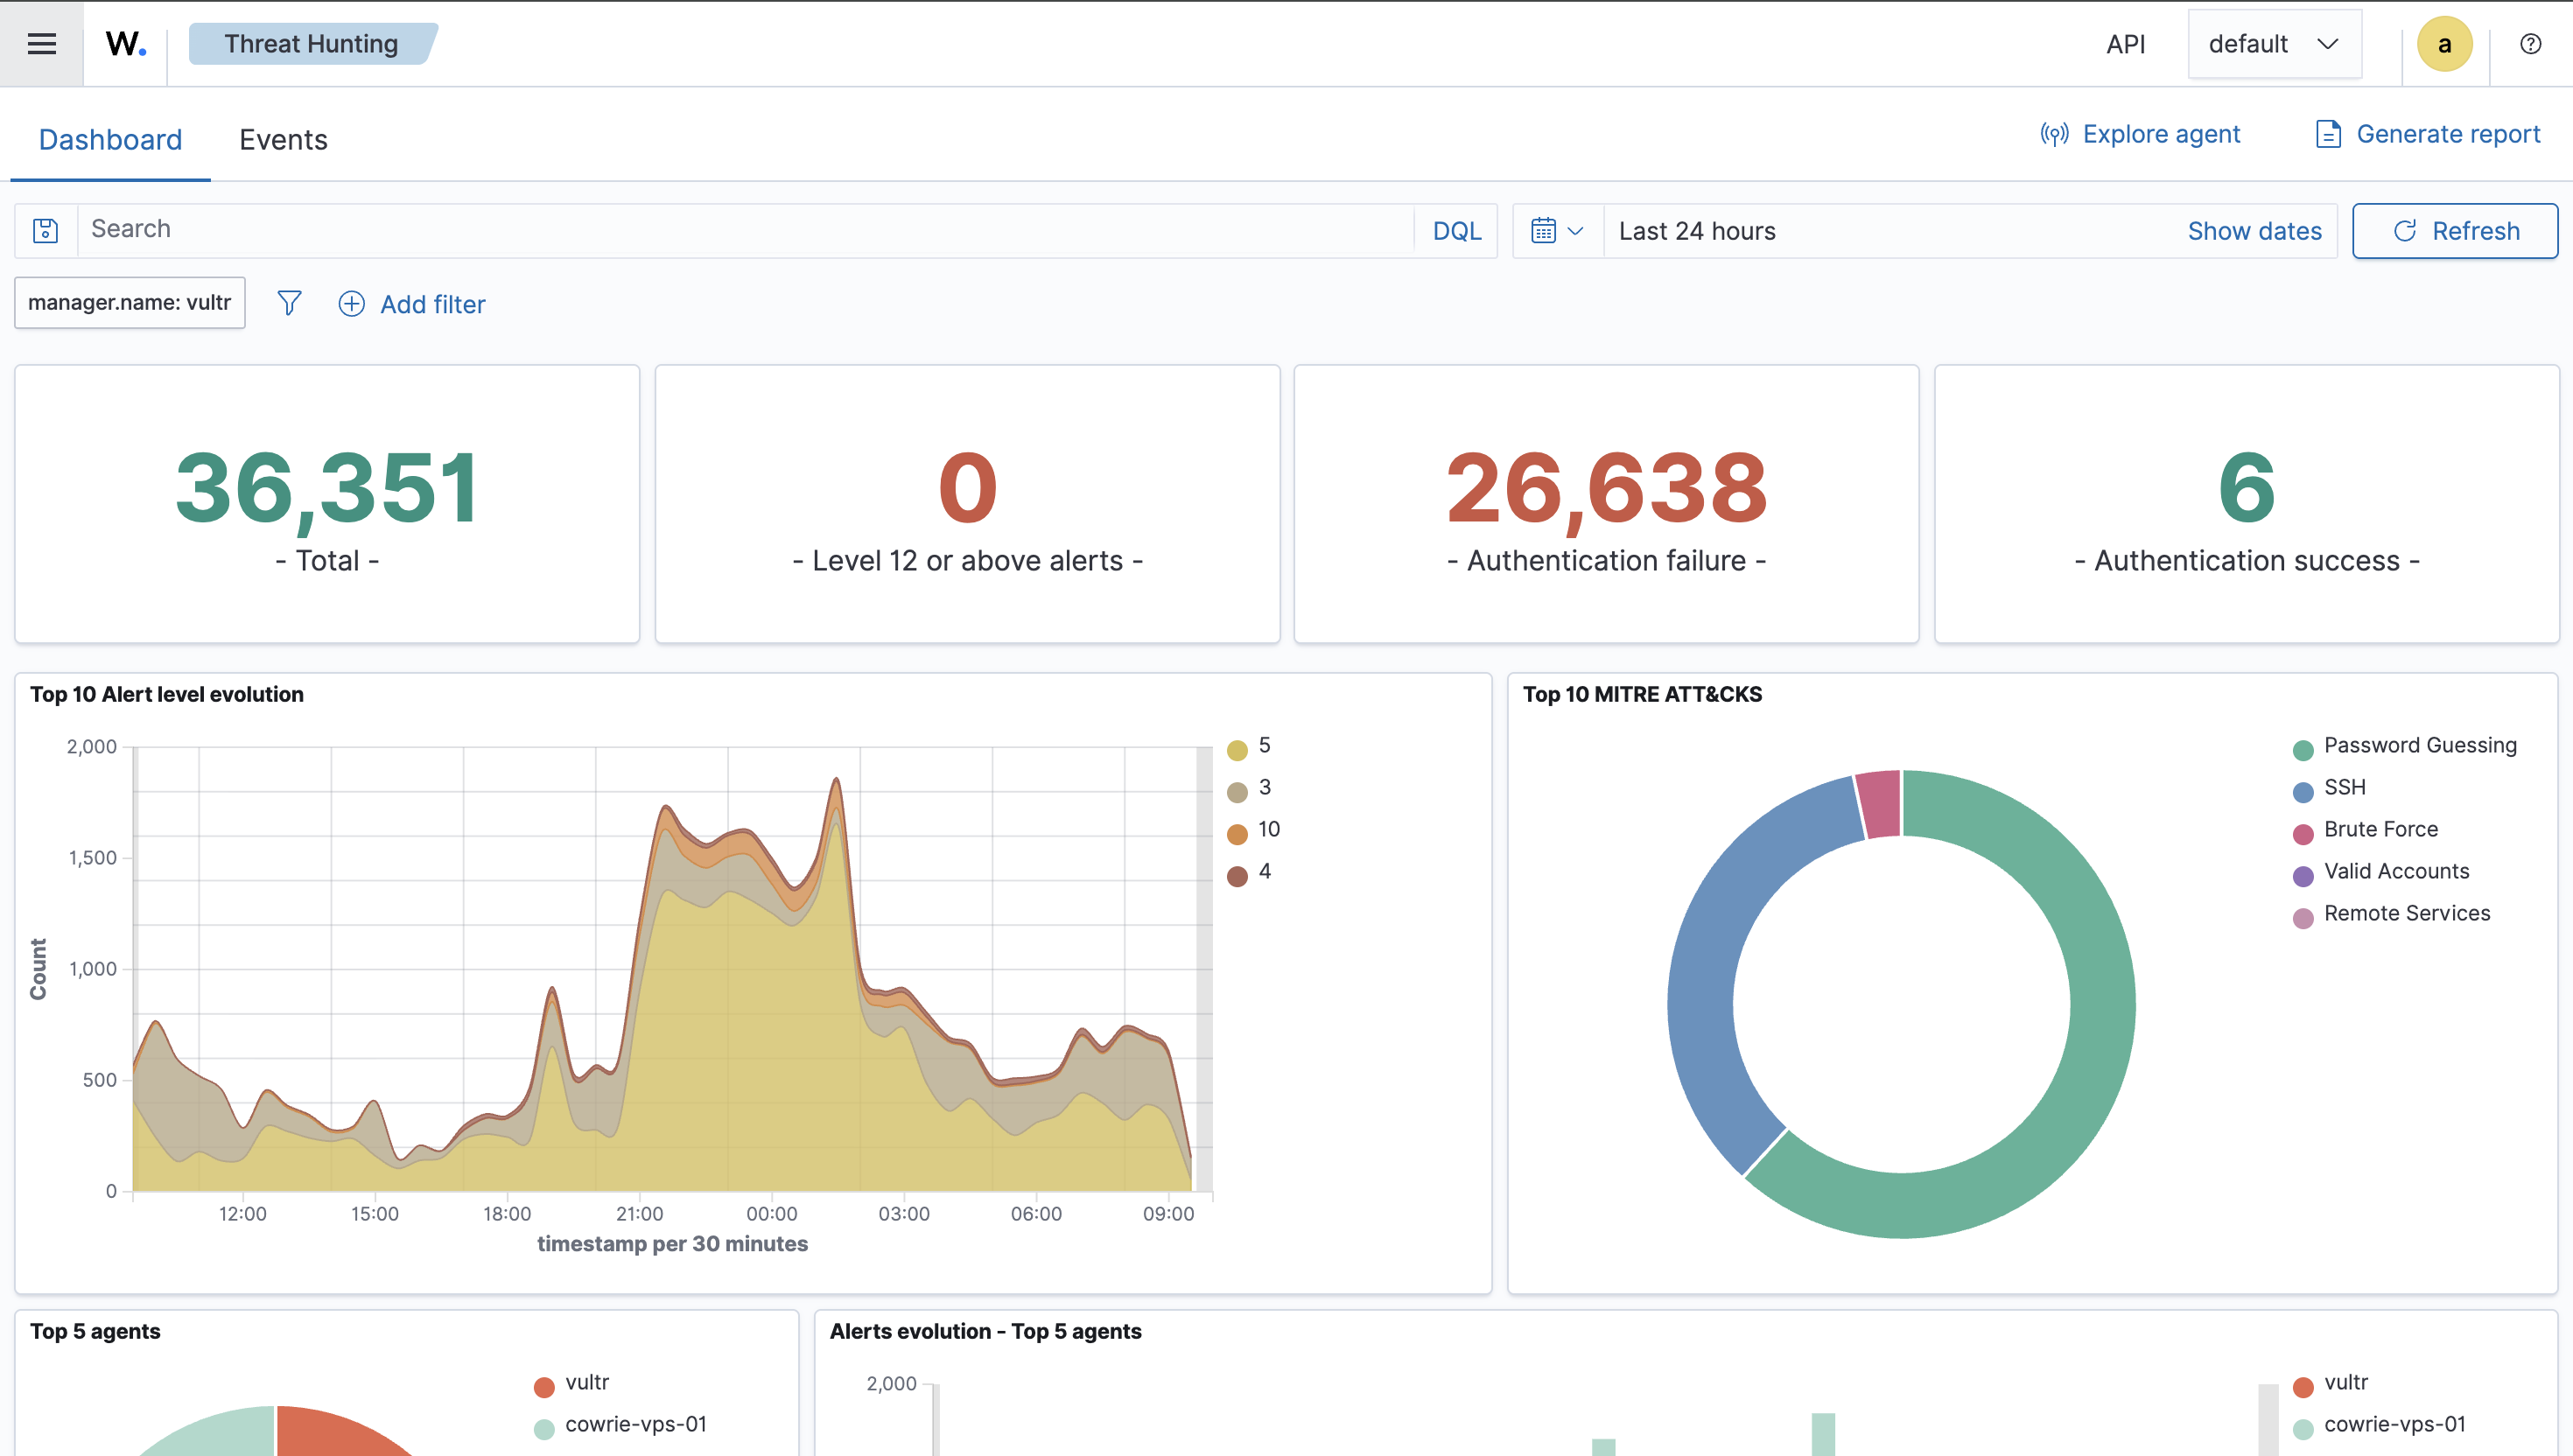
Day 2
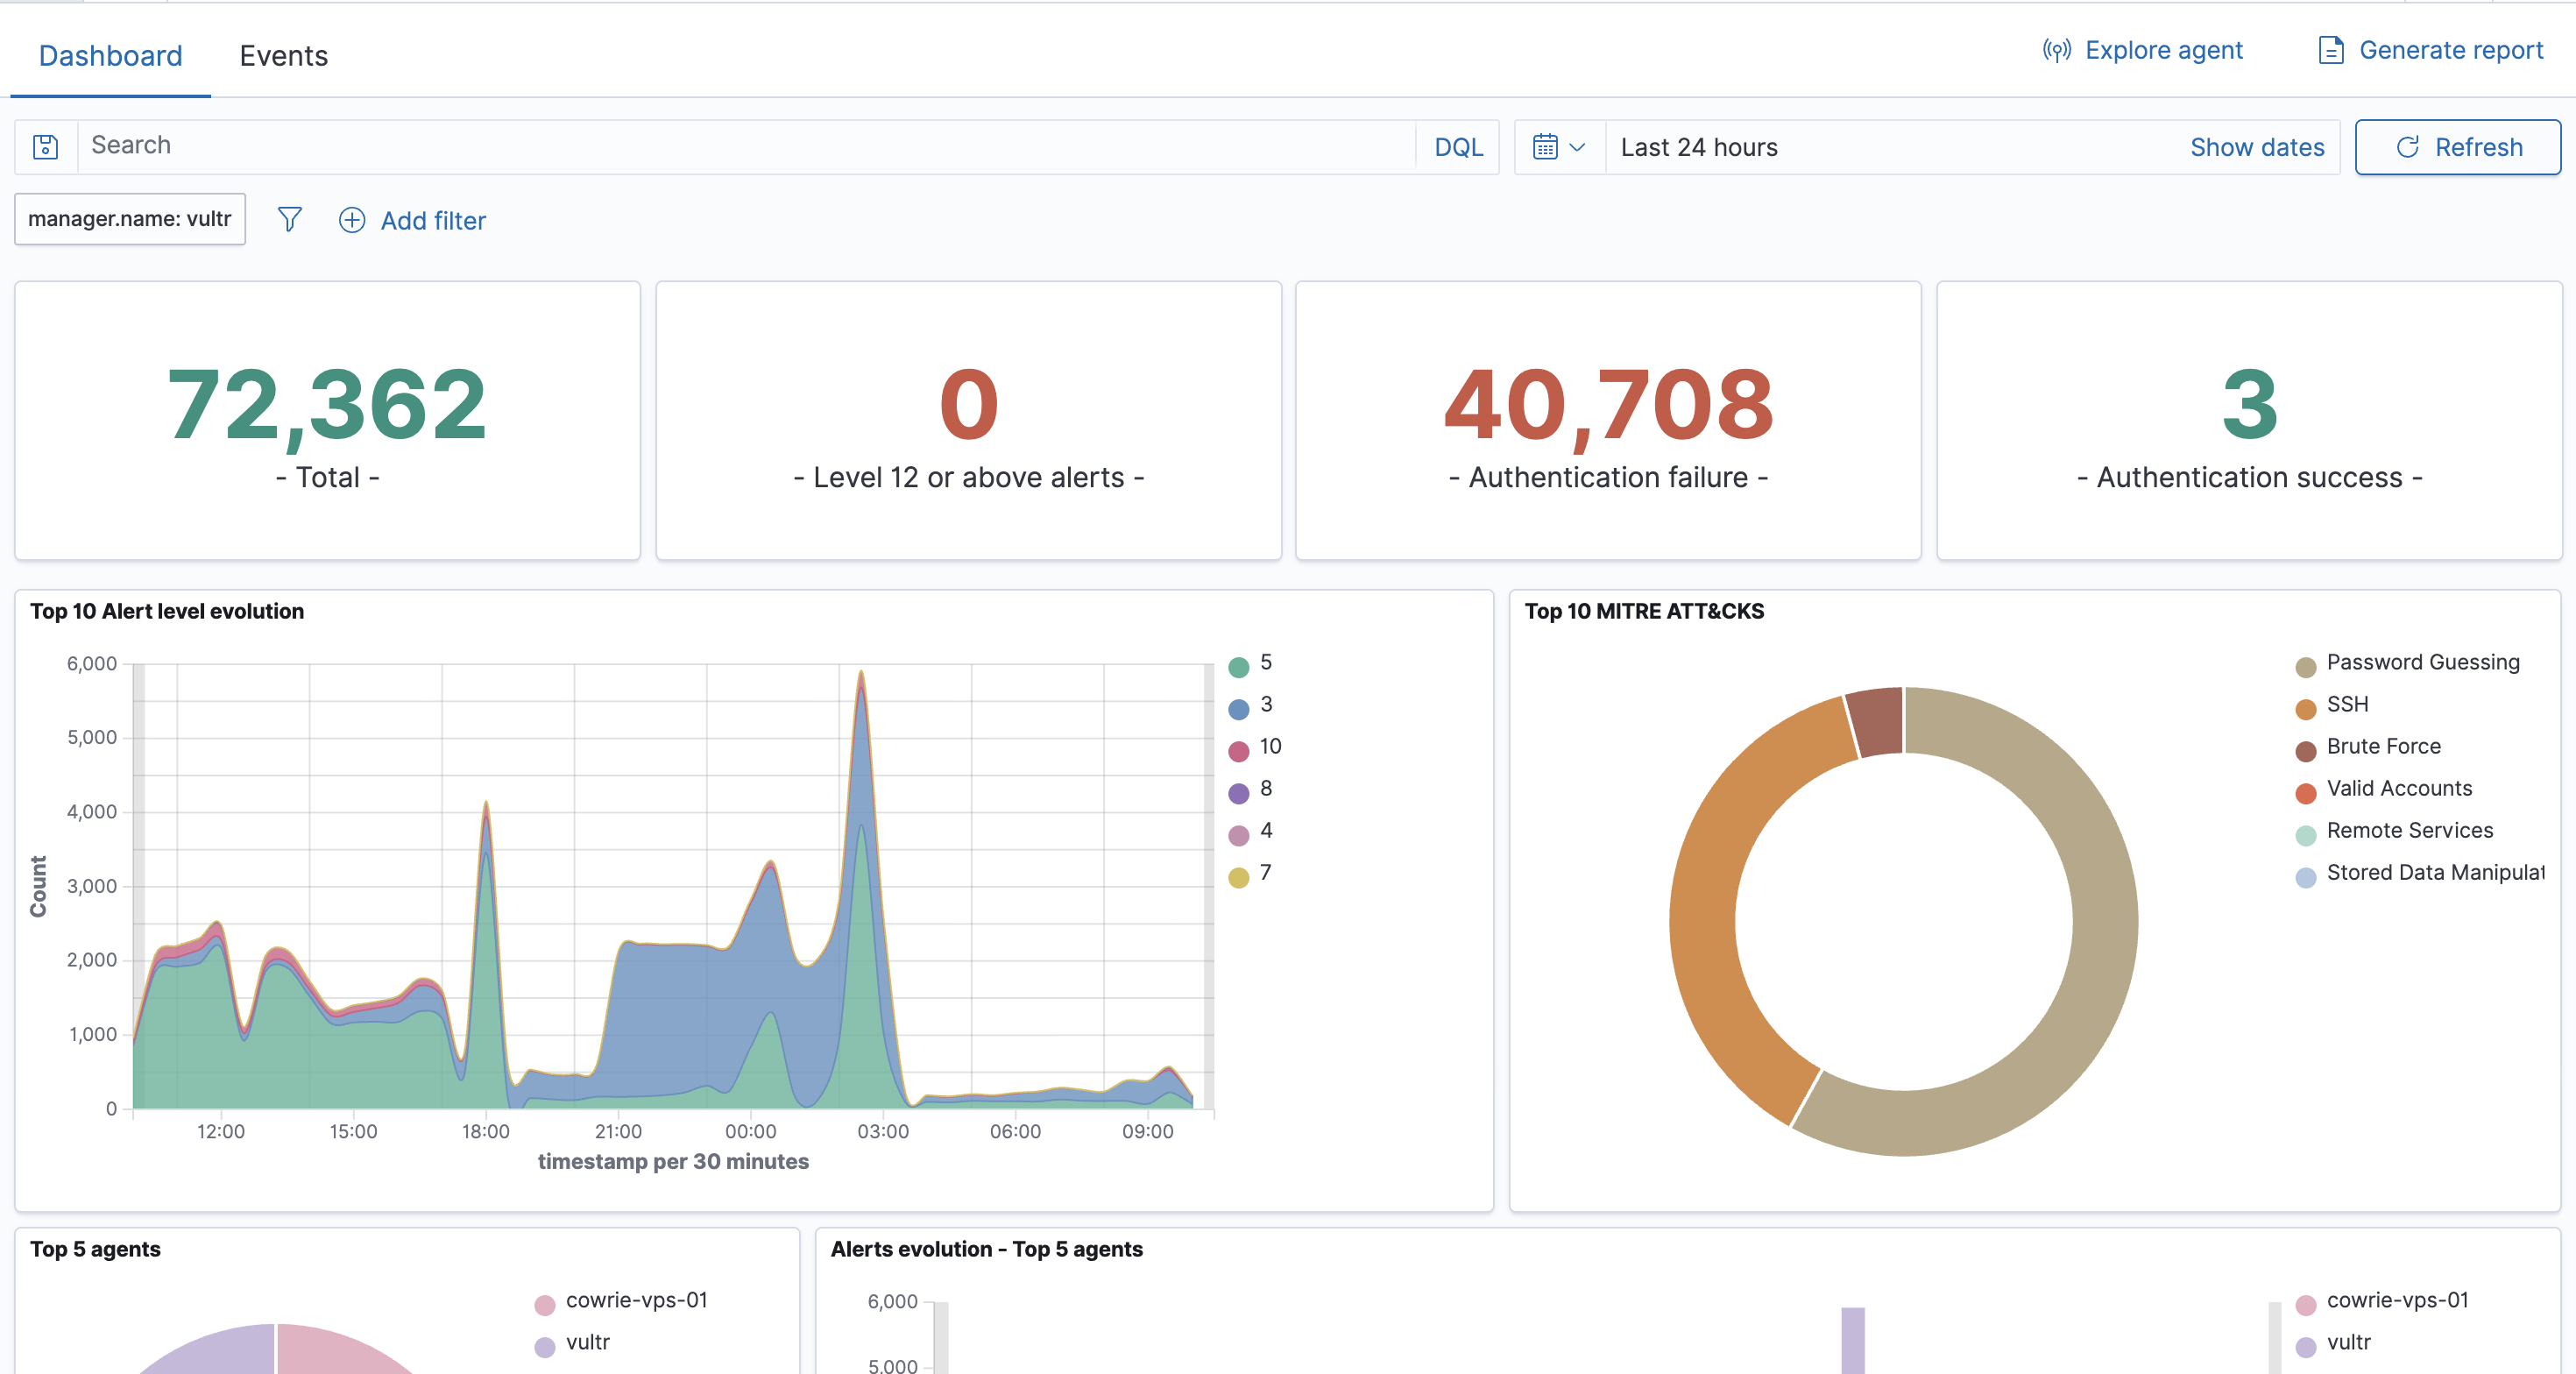
 We also find some interesting attack paths. We could discover the pattern and more things in the future.
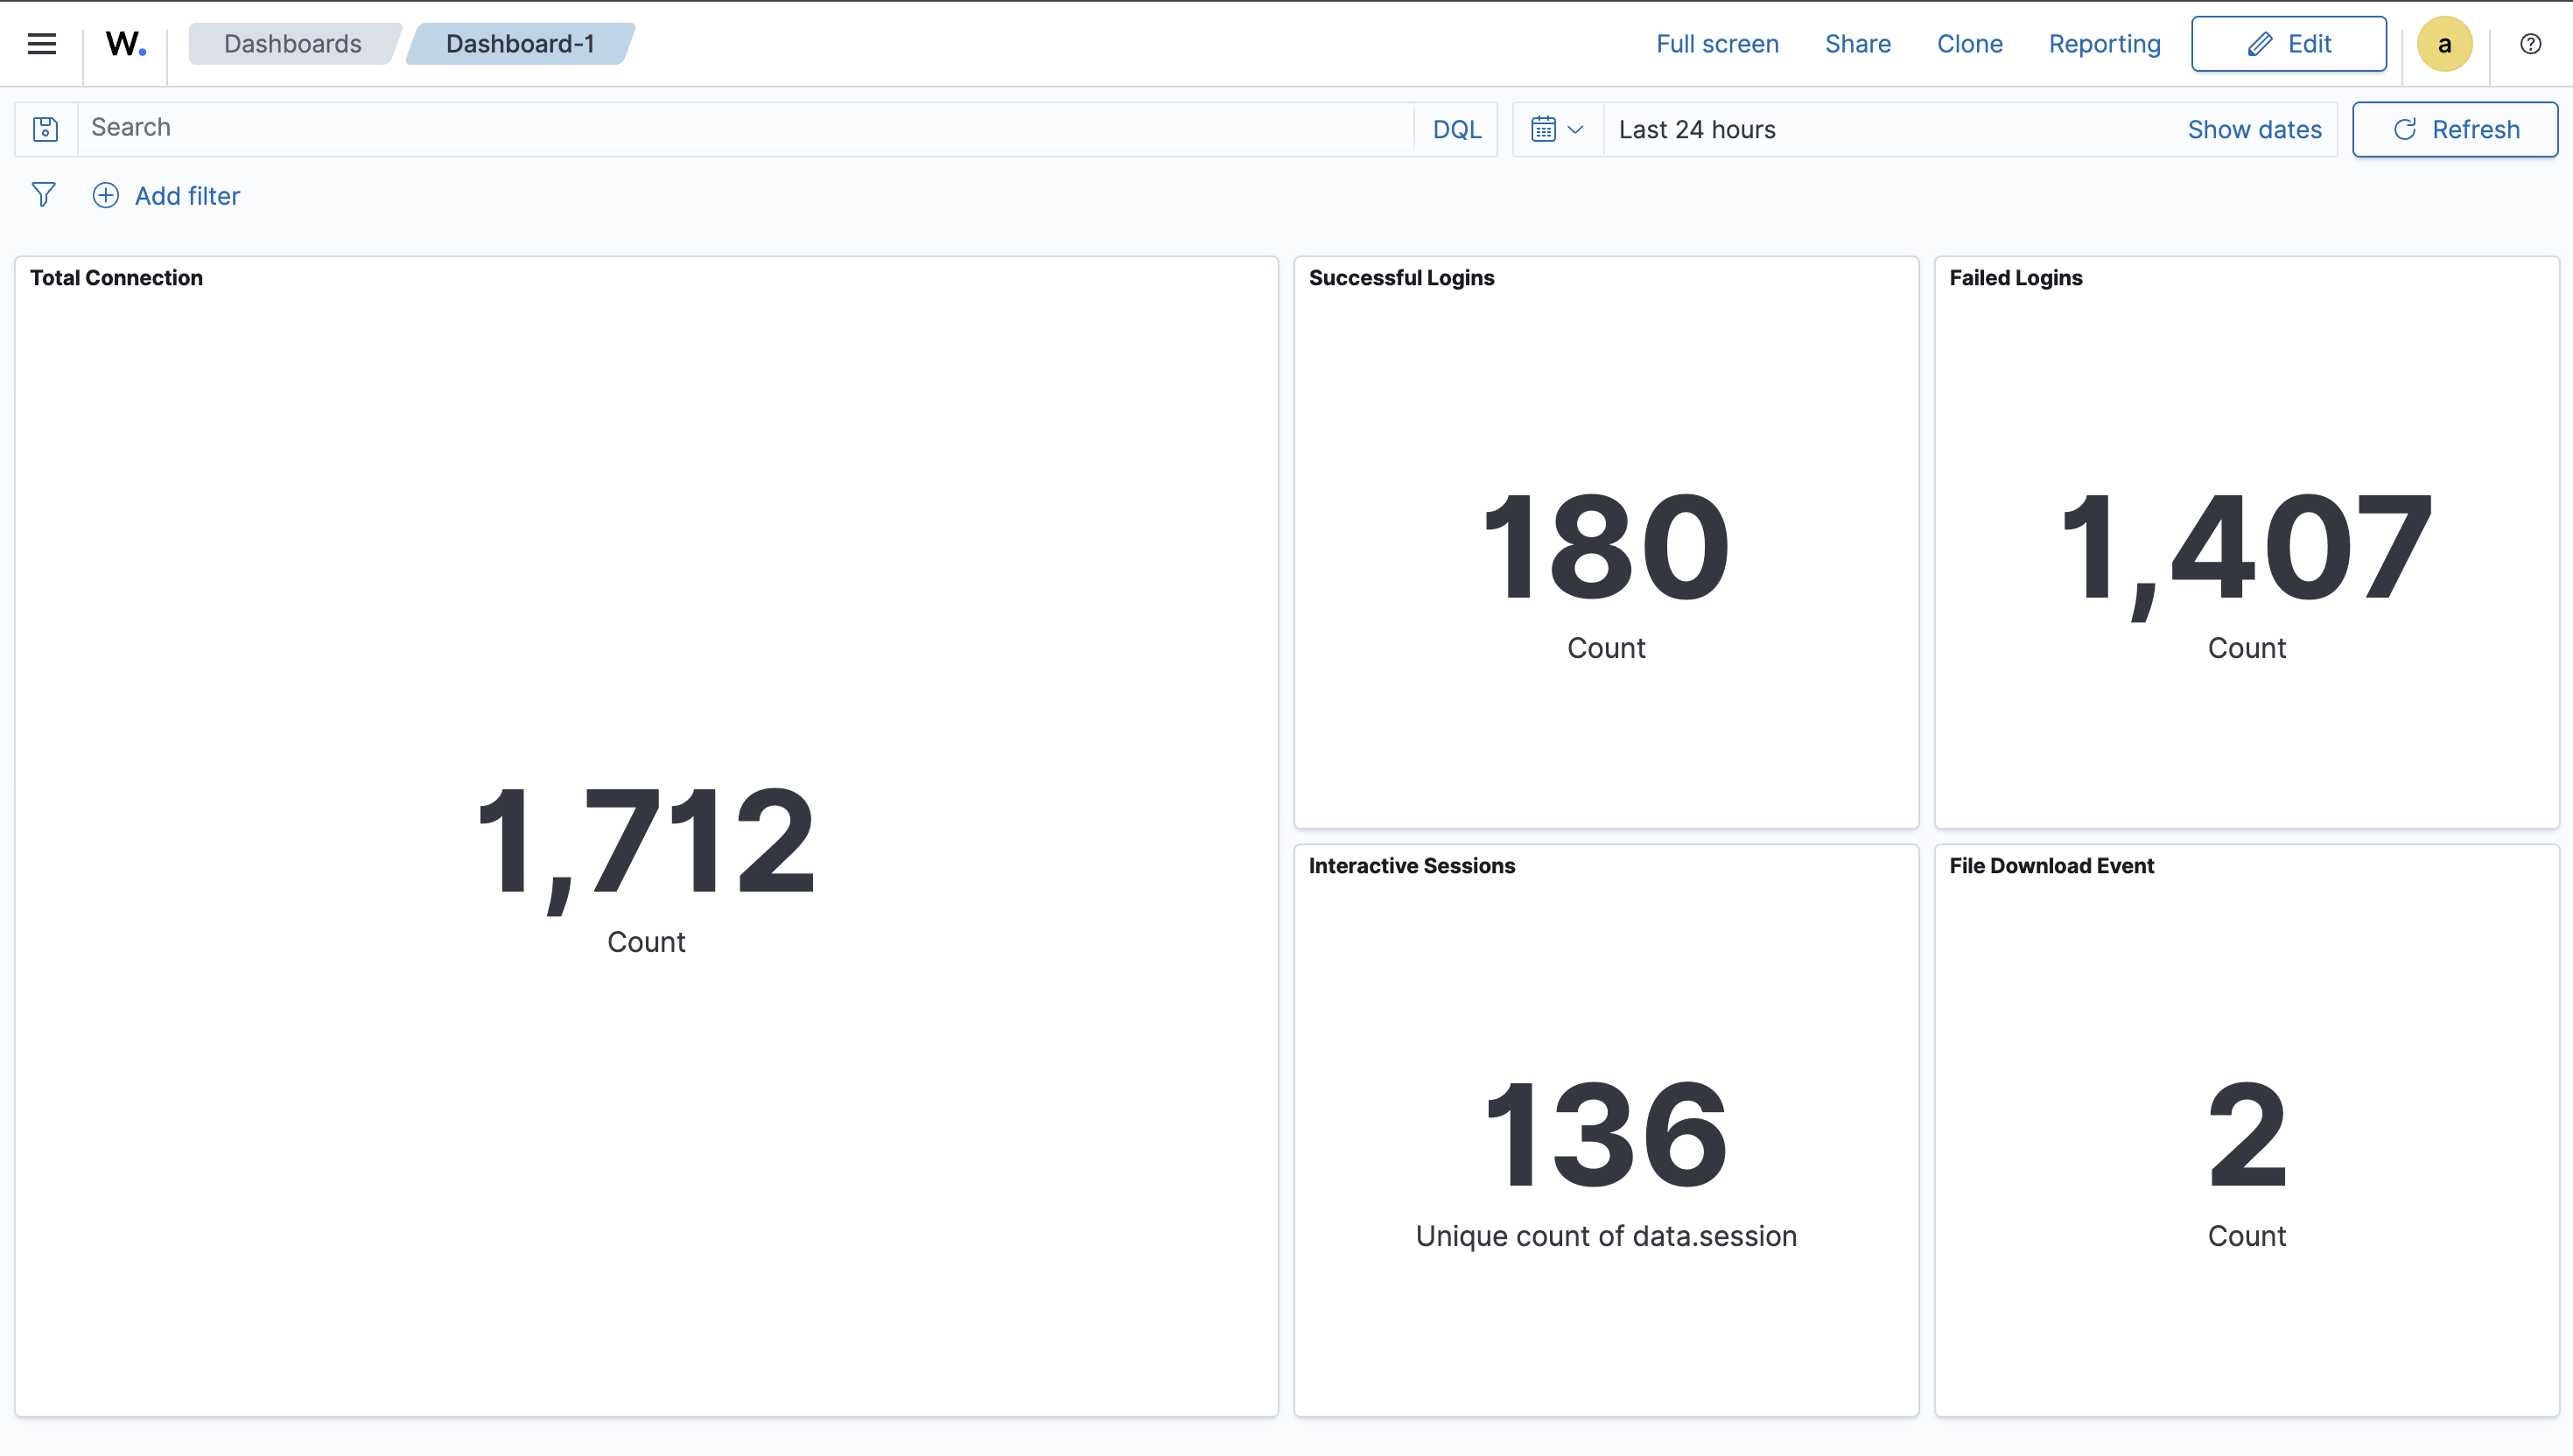
Day 3
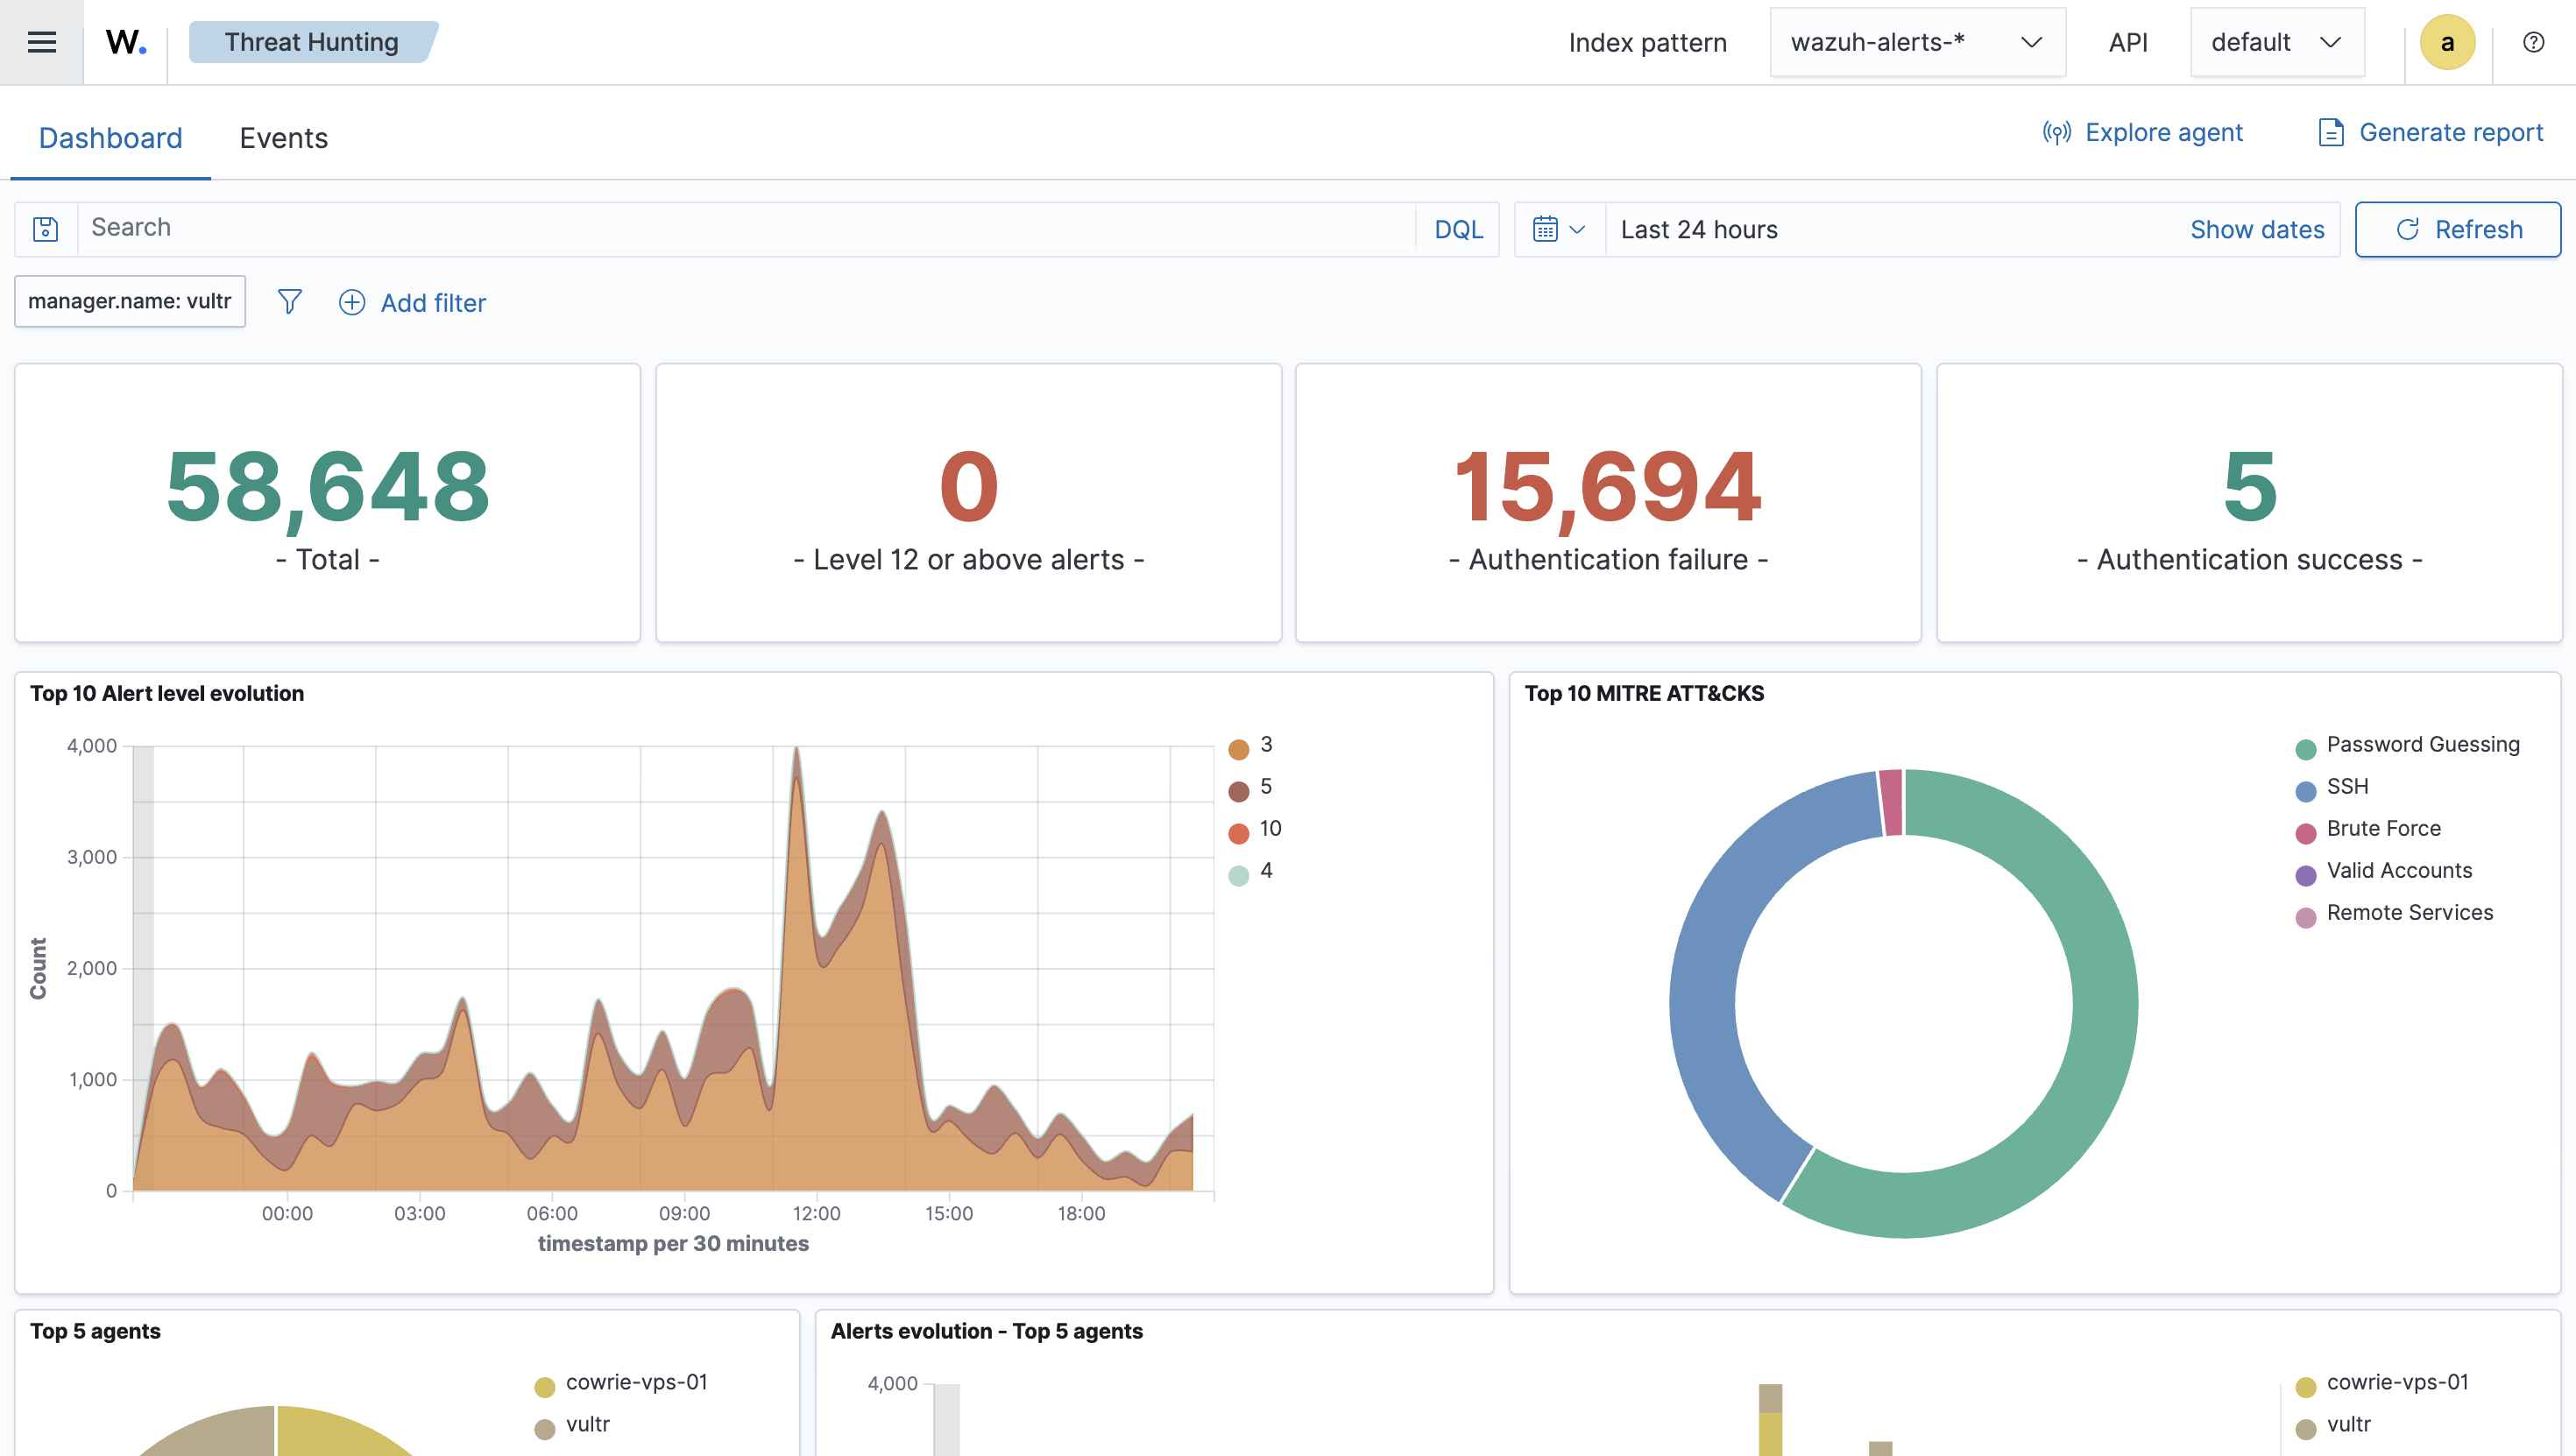
Day 4
Day 5
Day 6
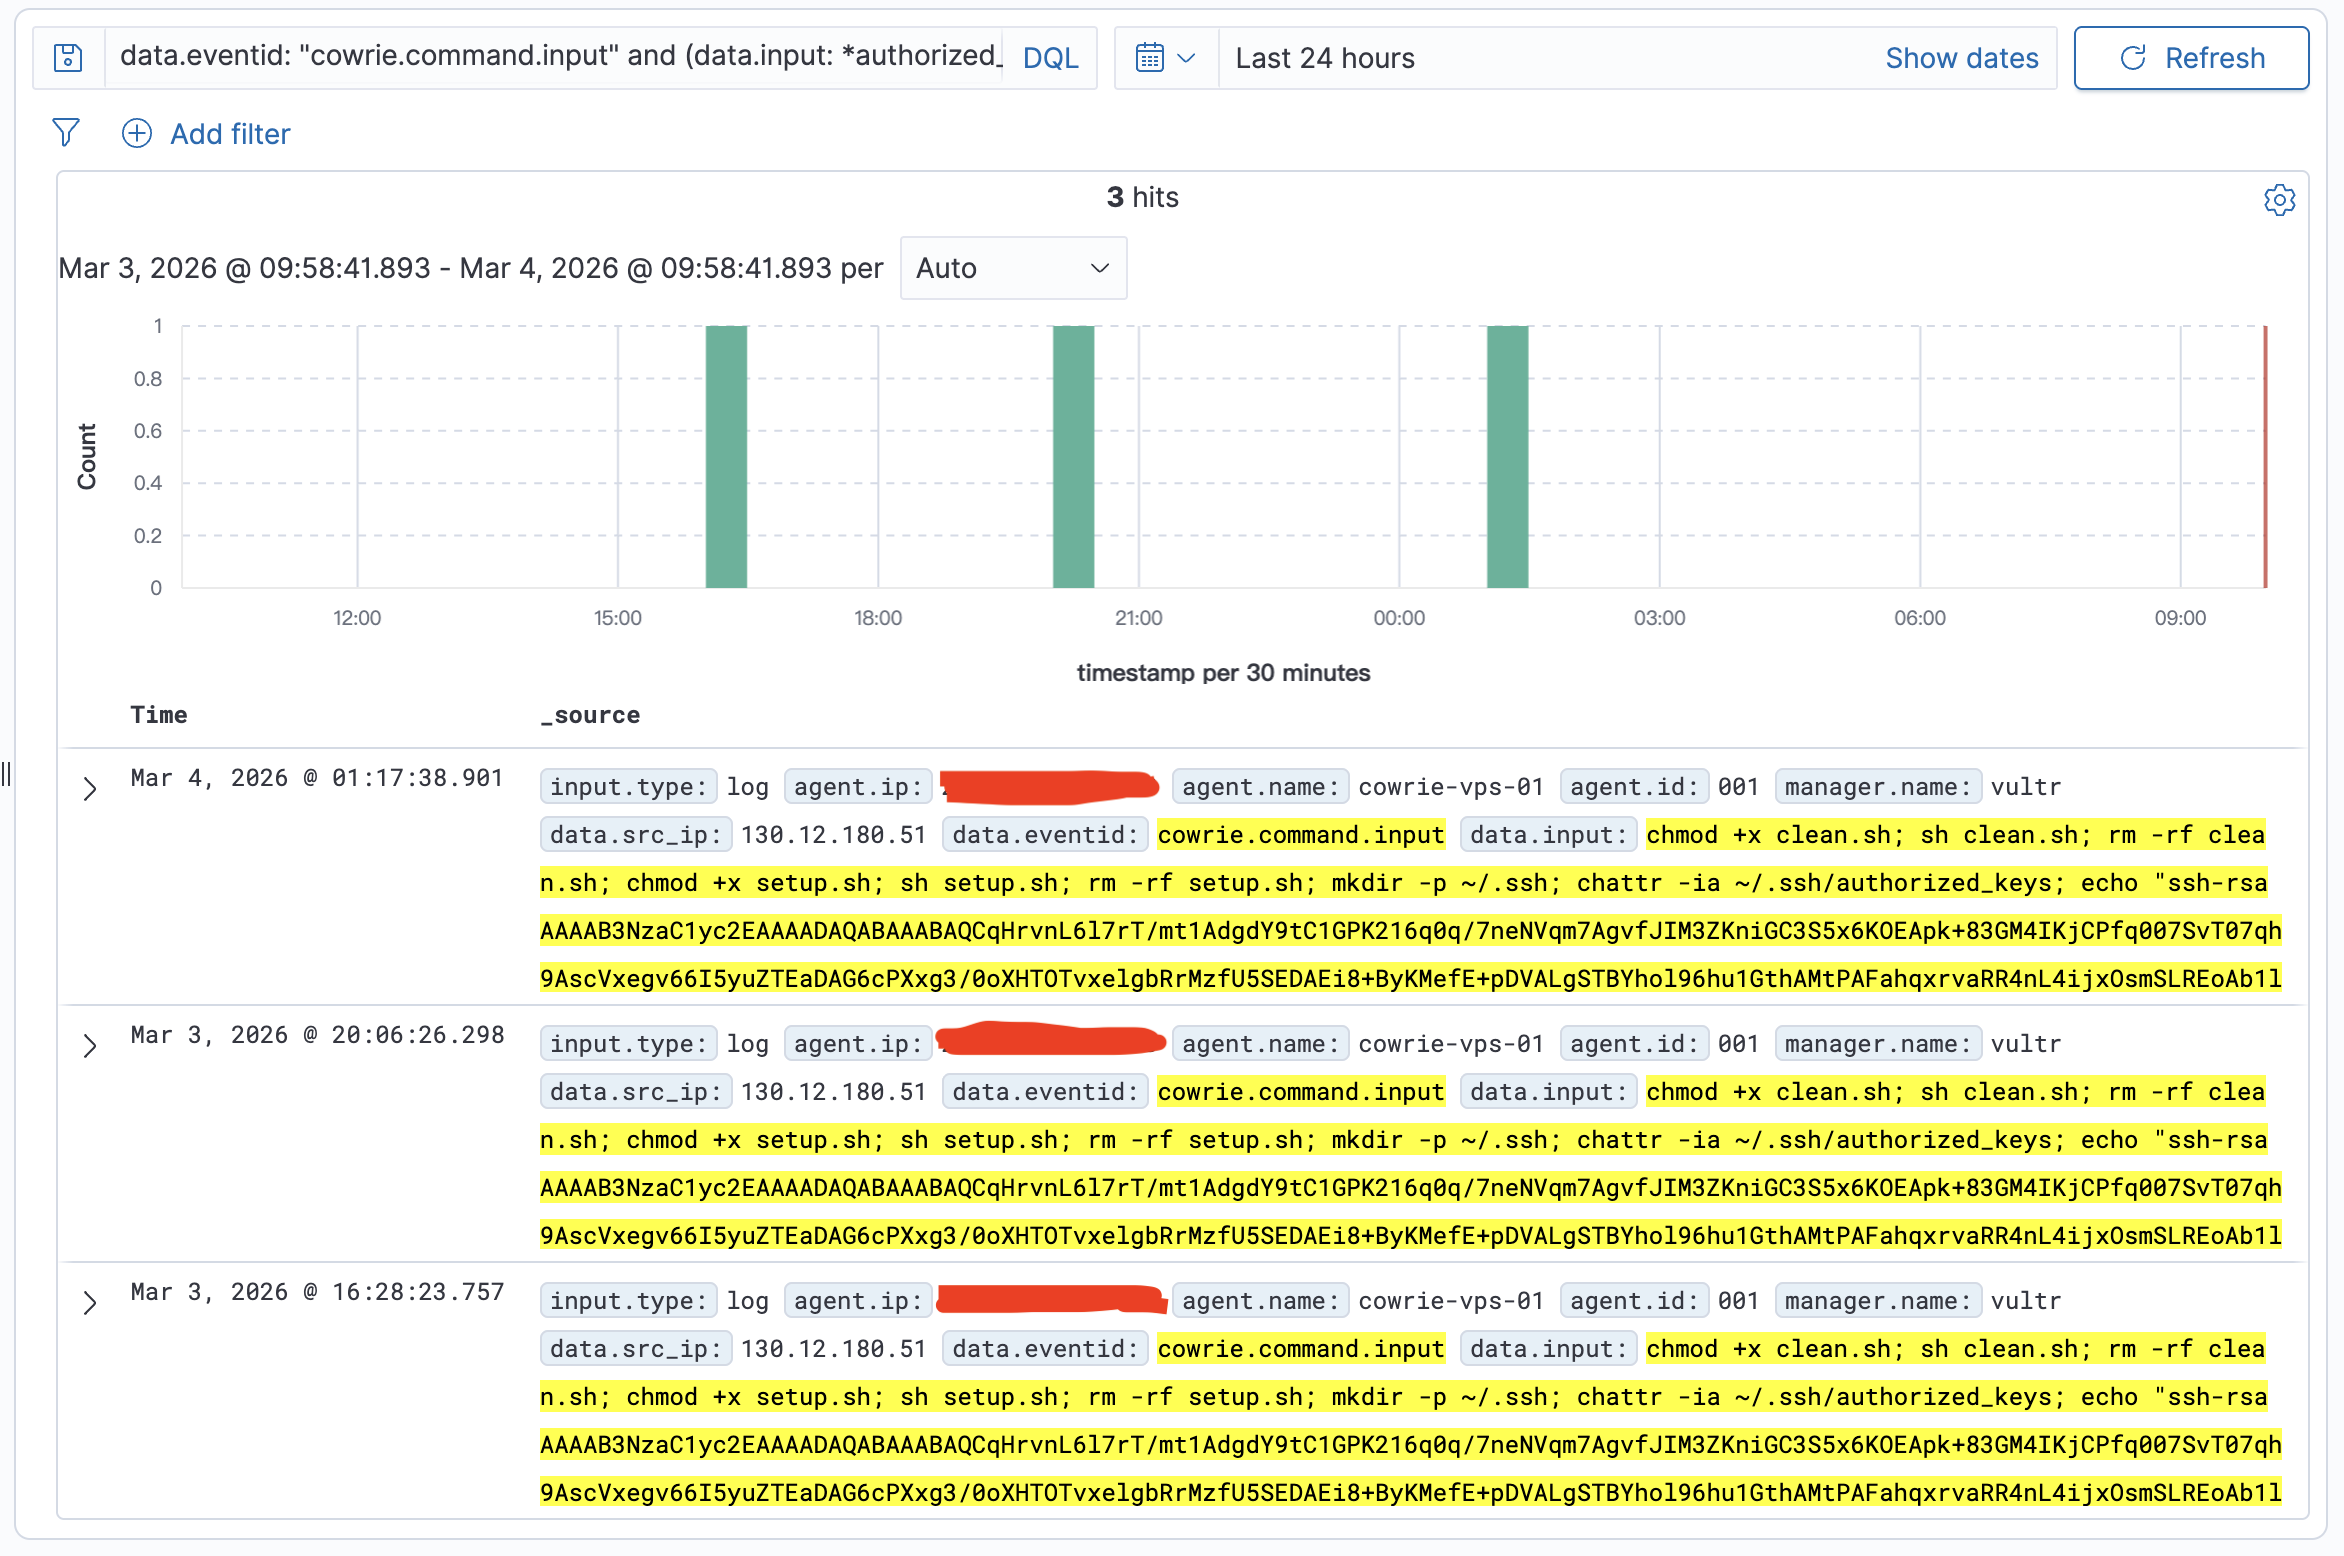
I started analyzing hacker’s pattern and TTP(Tactic, Technique, Procedure). You can refer this article Cowrie Honeypot: Shell Script Loader/Dropper TTP Analysis for more information. In short, this shellscript is for paralyzing and taking over Tecent Cloud servers and it could be considered as a loader/dropper.
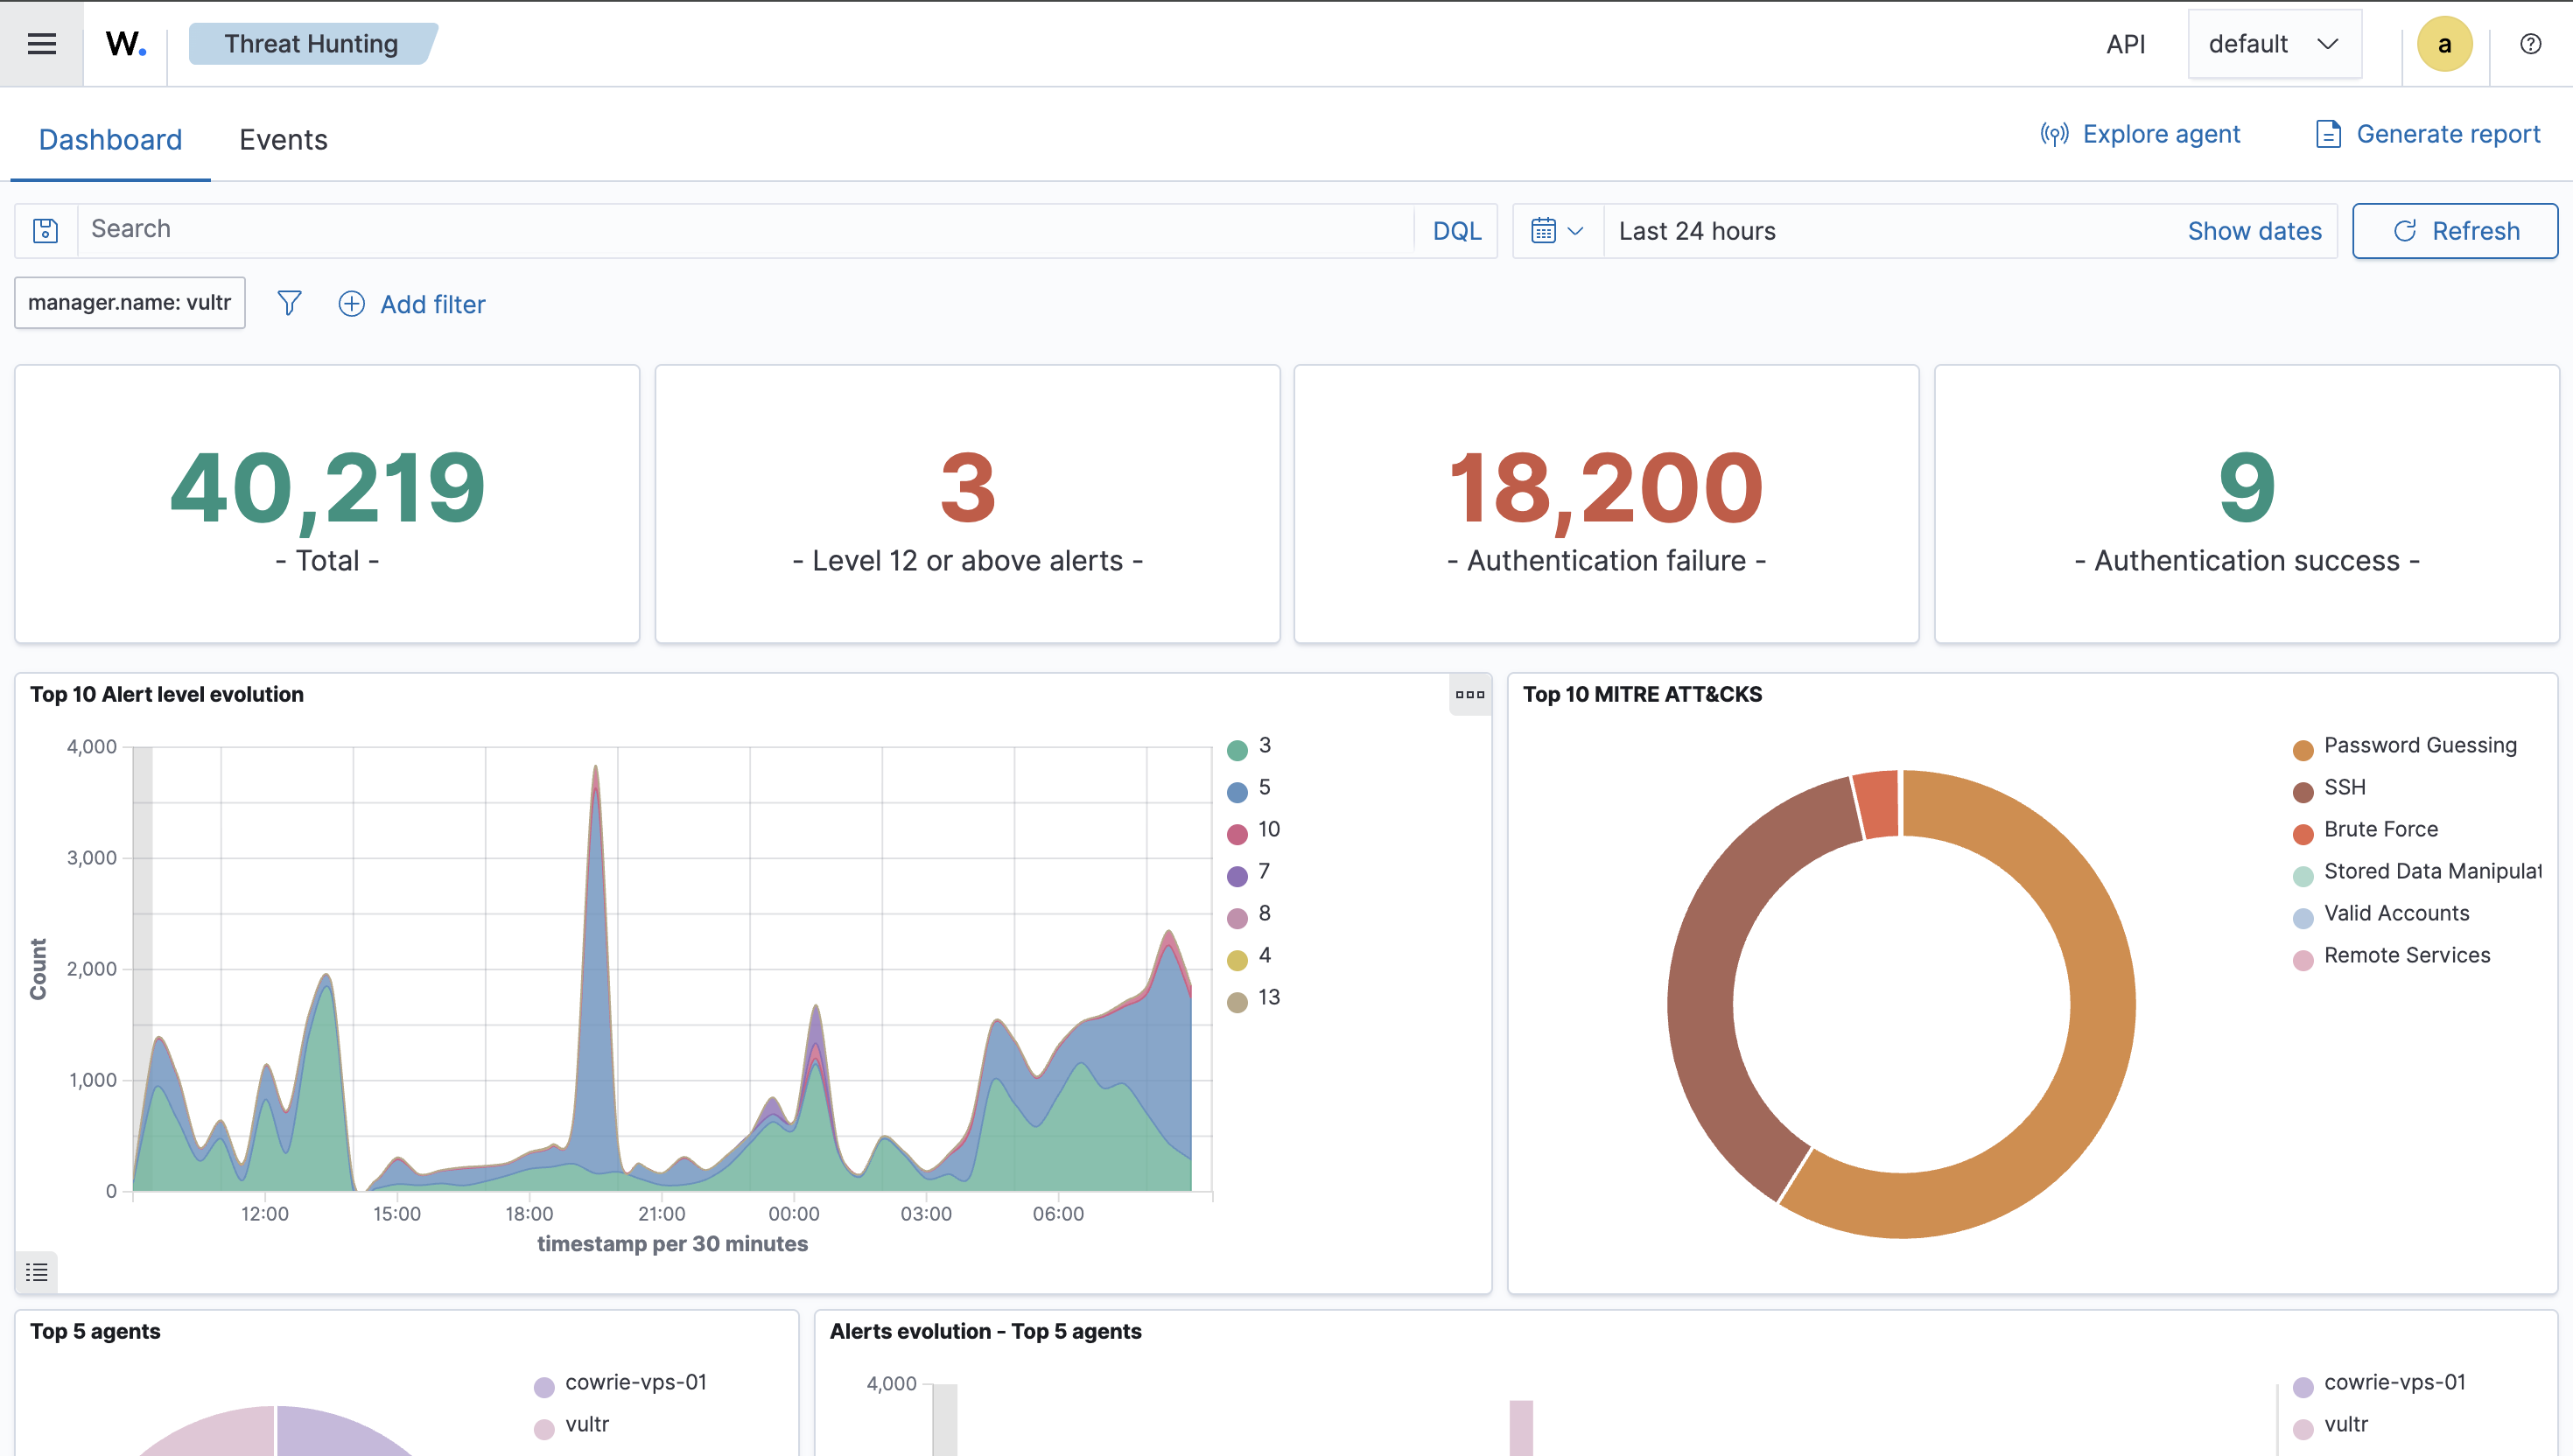
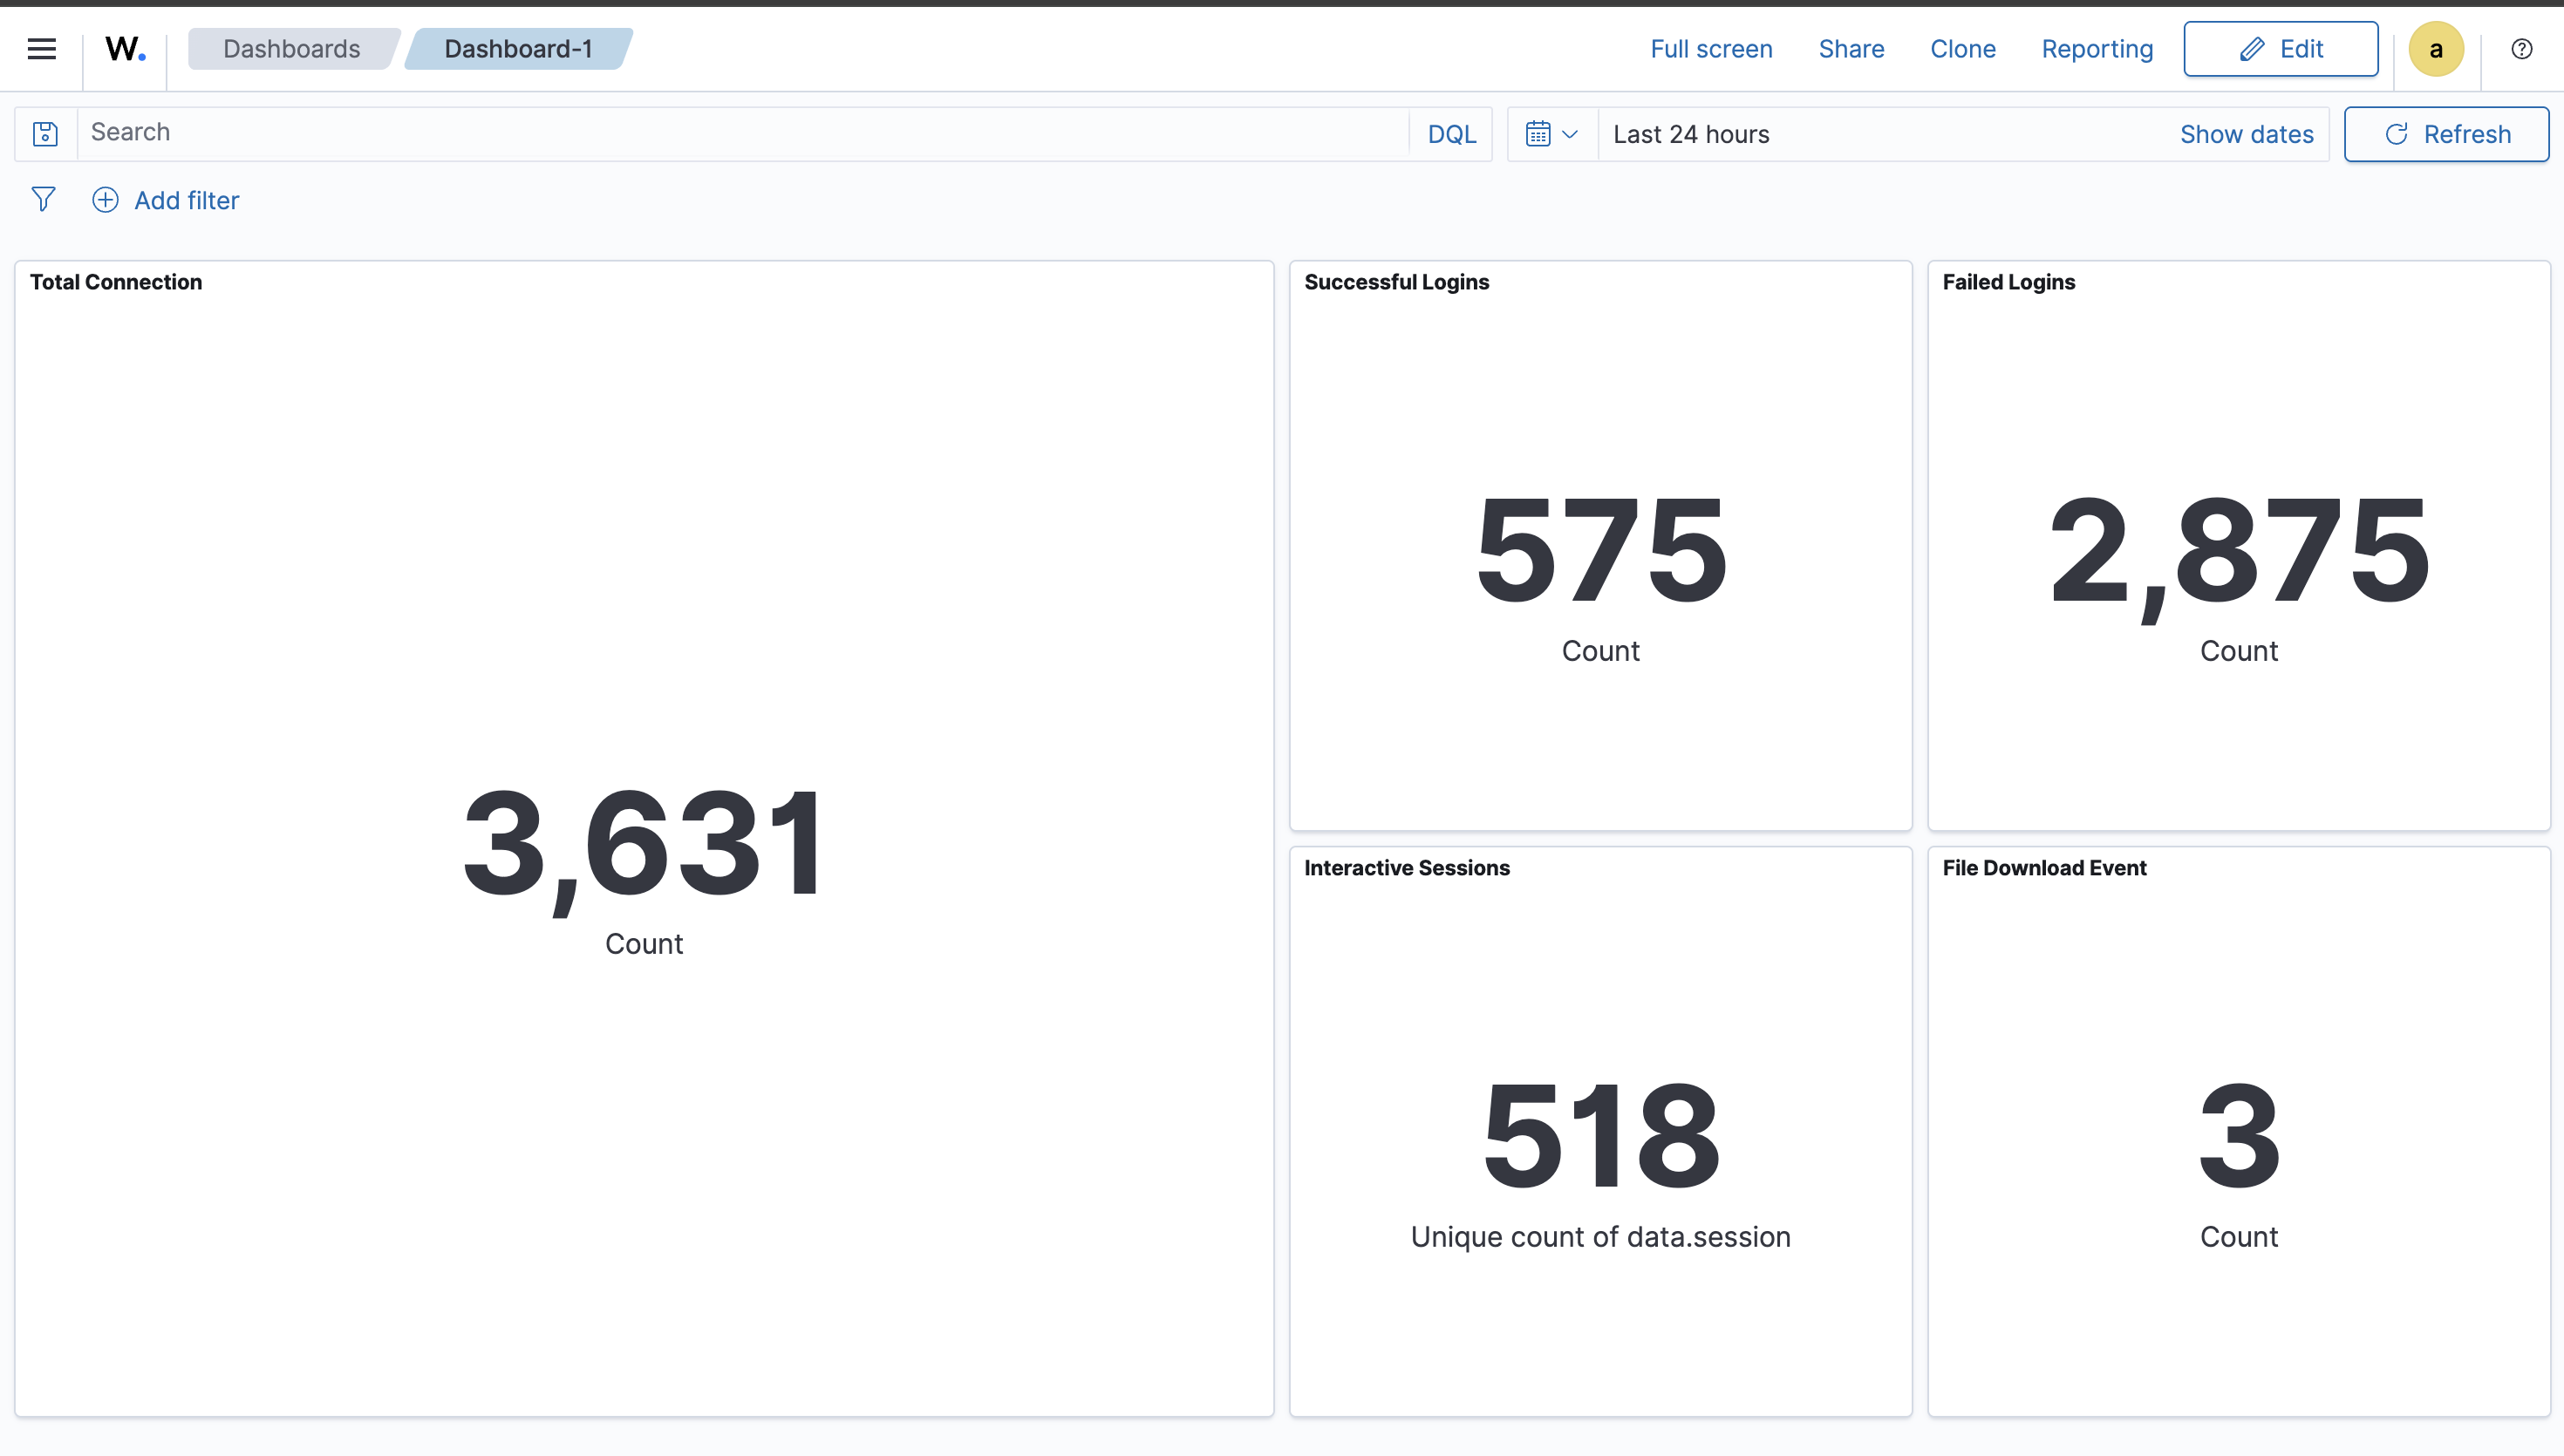
Day 7
In the Day7 image provided above, we observed that the file download event counts are abnormally larger than previous 6 days. As a result, we further query the top 10 files which these attackers most likely download.
GET wazuh-archives-*/_search
{
  "size": 0,
  "query": {
    "term": {
      "data.eventid": "cowrie.session.file_download"
    }
  },
  "aggs": {
    "top_destfile": {
      "terms": {
        "field": "data.destfile",
        "size": 10
      }
    }
  }
}
{
  "took": 4,
  "timed_out": false,
  "_shards": {
    "total": 12,
    "successful": 12,
    "skipped": 0,
    "failed": 0
  },
  "hits": {
    "total": {
      "value": 195,
      "relation": "eq"
    },
    "max_score": null,
    "hits": []
  },
  "aggregations": {
    "top_destfile": {
      "doc_count_error_upper_bound": 0,
      "sum_other_doc_count": 0,
      "buckets": [
        {
          "key": "/root/.ssh/authorized_keys",
          "doc_count": 185
        },
        {
          "key": "/etc/hosts.deny",
          "doc_count": 10
        }
      ]
    }
  }
}
And we got the result where they most likely download /root/.ssh/authorized_keys and /etc/hosts.deny. First, /root/.ssh/authorized_keys records a whitelist of OpenSSH public keys. If attackers grab this file, they can easily use these keys to login as root without password. Next, attackers may target /etc/hosts.deny because it’s a simple way to control or restrict network access to services (via TCP Wrappers on systems where it’s honored). Common motives include:
- Locking down the host after compromise: Add deny rules to reduce the chance other attackers can access the same machine.
- Disrupting defenders and recovery: Block known admin to make legitimate SSH access harder during incident response.
- Stabilizing their foothold: Limit inbound connections to decrease noise that could expose their activity.
- Recon/testing for legacy access controls: Many automated scripts check whether TCP Wrappers is in use; downloading
hosts.denyhelps them decide if it’s a viable control point on that system.
From my perspective, in a honeypot context like ours, attackers may simply be running a standard post-login script that touches this file regardless of whether it actually takes effect.